| 8MS User Guide |
Company Administration |
Main Help Page
|
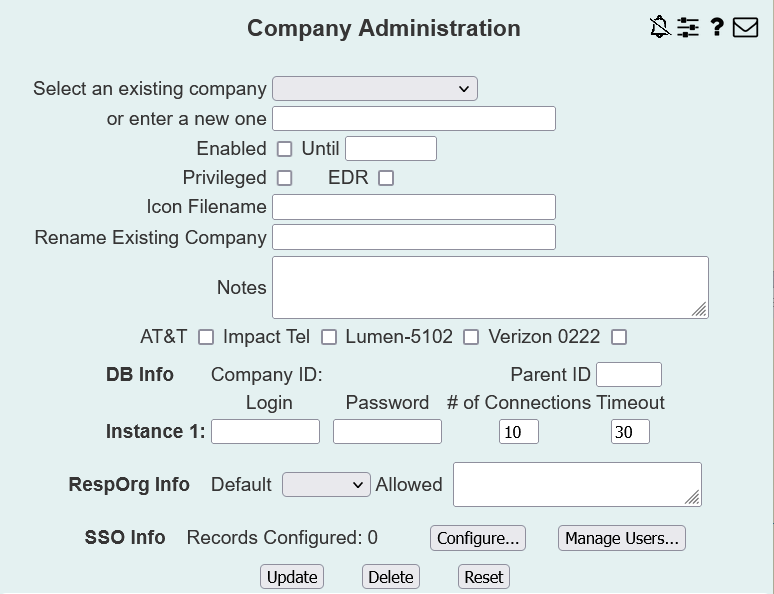
This function allows you to view, update or add a company.
In the menu frame, select the Company link located in the System Admin section of the menu. The following will appear on the screen:
Enter the Company:
Following is an explanation of all remaining fields on the screen.
| Field | Description | |
|---|---|---|
| Enabled | Allows/disallows users for this company to log in. | |
| Enabled Until | Last date that the company will be enabled. Blank means that the company is indefinitely active. | |
| Privilieged | Allows/disallows users, for this company, to see information from other companies. | |
| EDR | Indicates this company is an EDR (Enterprise Disaster Recovery) company. | |
| Icon Filename | Name of the company's icon file (usually it's logo) that appears on the welcome screen. | |
| Rename Existing Company | New company name if it is being renamed. | |
| Notes | Free-format notes for this company. | |
|
|
||
| Parent ID | The id of the company that is the "parent" of this company. This is used for support of sub-companies. | |
| Login | The database login name for this company. | |
| Password | The password for the database login above. | |
| # of Connections | Maximum number of users, using the company's database login, that can access the database at one time. | |
| Timeout | Maximum time, in minutes, that an inactive user may be connected to a database before being logged out. | |
|
|
||
| Default | The default value for RespOrg, for a company and its users, when using functions that need a Resp Org, for example, Record Management and Change RespOrg. | |
| Allowed | Space delimited list of RespOrgs that are used by this company. | |
|
|
||
| Records Configured | A read-only field that indicates whether or not this company is configured for single sign-on. | |
| Configure | Click this to configure single sign-on aliases for this company. | |
| Manage Users | Click this to add or remove single sign-on ids for all users in this company. | |
To save changes or to save a new company, click the Update button.
To delete a company, click the Delete button. button.
To add or delete single sign-on aliases, click the Configure button.
To create or delete single sign-on user data, click the Manage Users button.
The SSO Config dialog is used to create aliases and to specify the single sign-on identity provider for a company. To view the SSO Config dialog, click the Configure button. The following dialog will appear over the Company screen.
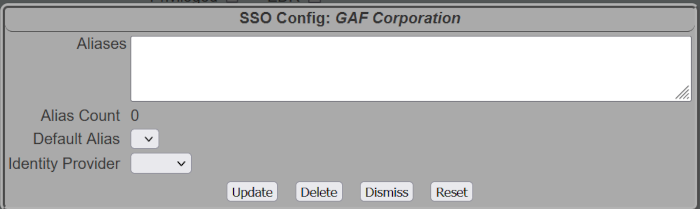
| Field | Description |
|---|---|
| Aliases |
The custom URLs -- aliases -- configured for this company.
Multiple aliases may be separated by a newline, a space, or a comma. |
| Alias Count | A read-only field showing the number of aliases defined in the Aliases text area. |
| Default Alias | The alias shown to users in a company configured for SSO when those users attempt to log in using the secureXX.8msweb.com URL. |
| Identity Provider | The SSO system used for controlling access to 8MS. |
To configure a company to use the single sign-on service, an alias must be added in to the Aliases text area. When moving focus out of that text area, the values will be reformatted so each alias is on its own line. Additionally, the Default Alias drop-down will be populated with all aliases in the text area, and the Alias Count read-only field will update with the number of aliases in the text area.
Select the Default Alias and the appropriate Identity Provider.
When done, select the
To modify the list of Aliases, or to change the Default Alias
or Identity Provide, simply make the changes and click the Update
button, and the changes will be saved to the 8MS database.
The dialog initially shows all users in this company, with their current SSO
state. Data shown includes
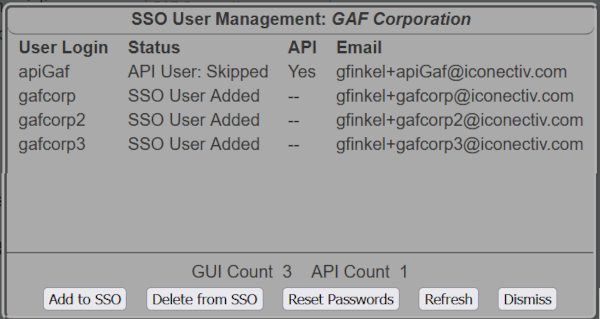
When adding user data to an Identity Provider or deleting that data,
the dialog changes appearance as shown below.
The SSO User Id is not shown, but a Status is added.
The above screenshot shows that all GUI users had their SSO data created
at the Identity Provider, while the API user was skipped. If there
were validation or processing errors, each user with a problem will
have the Status shown.
Below are the possible status values that can occur when adding to or deleting
from the Identity Provider.
To create SSO data for GUI users (API users cannot log in via single sign-on),
click the Add to SSO button. Once all users have been processed,
the dialog will appear as shown above.
To delete SSO data for GUI users (API users cannot log in via single sign-on),
click the Delete from SSO button. Once all users have been processed,
the dialog will appear as shown above but each successful change
will show SSO User Deleted.
To reset SSO passwords for all users in a company, click the
Reset Passwords button. Once all users have been processed,
the dialog will appear as shown above but each successful change
will show SSO Password Reset.
At any point, to view the latest SSO user data, click the Refresh
button. This will retrieve the data currently stored in the 8MS database.
A few notes:
Updating Aliases
Deleting Aliases
To delete all aliases, which will disable single sign-on and return
a company back to the legacy 8MS sign-on, click the Delete
button. All aliases will be removed from the 8MS database.
Configuration data may not be deleted if user SSO data still exists.
Refer to the section Managing Single Sign-On Users for
details on how to do this.
Managing Single Sign-On Users
The SSO User Management dialog is used to create SSO user data at
the Identity Provider provisioned in the SSO Config dialog.
SSO Config data must be created before adding SSO user data.
To view the SSO User Management dialog, click the
Manage Users button. The following dialog will appear over
the Company screen.
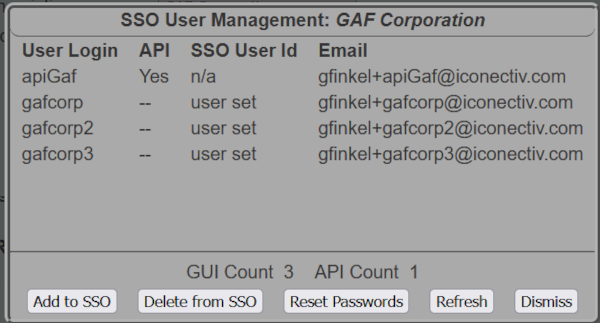
Field
Description
User Login
the 8MS login
API
indicates whether this user is an API or a GUI user
SSO User Id<
/td>
shows tells you if this user has been provisioned at
the Identity Provider
Email
is the user's email address. This is important to show
because many Identity Providers require unique email
addresses.
GUI Count
shows the number of GUI users for this company.
API Count
shows the number of API users for this company.
A few notes:
Common Behavior for Add and Delete
Status
Description
SSO User Added
user successfully added to the Identity Provider
SSO User Deleted
user successfully deleted from the Identity Provider
GUI/API Conflict: Skipped
This user has a User Type and an API Type defined.
This can be seen and corrected only from the Users screen.
API User: Skipped
This user is an API user. API Users are not configured as
SSO users; they use the legacy 8MS password management.
No SSO UserId: Skipped
For deleting a user, if Identity Provider unique
id is not stored locally, it cannot be deleted from the
Identity Provider. The most likely reason it is not stored
locally is because it was never created.
Has SSO UserId: Skipped
For adding a user, if the Identity Provider unique
id is stored locally, this user has already been
created at the Identitiy Provider.
Dup Email: Skipped
For adding a user, Identity Providers require unique email addresses.
If two users in this company have the same email address, neither
user will be added at the Identity Provider. The email address
may be corrected from the Users screen.
SSO UserId Taken
Another user already has this 8MS userid. 8MS userids must be
unique at the Identity Provider. This user must be given
a new 8MS userid. This may be resolved from the Users screen.
SSO Error
SQL Error
Malformed URL
Each of these status values indicates an unexpected
exception occurred. These exceptions will likely
requires investigation by the 8MS support team.
Adding SSO User Data
Deleting SSO User Data
The add and delete actions may be executed multiple times when
resolving conflicts or invalid data; executing these actions
again causes no problems with existing SSO user data.
Resetting SSO Passwords
Refreshing the View