| 8MS User Guide |
ROC Administration |
Main Help Page |
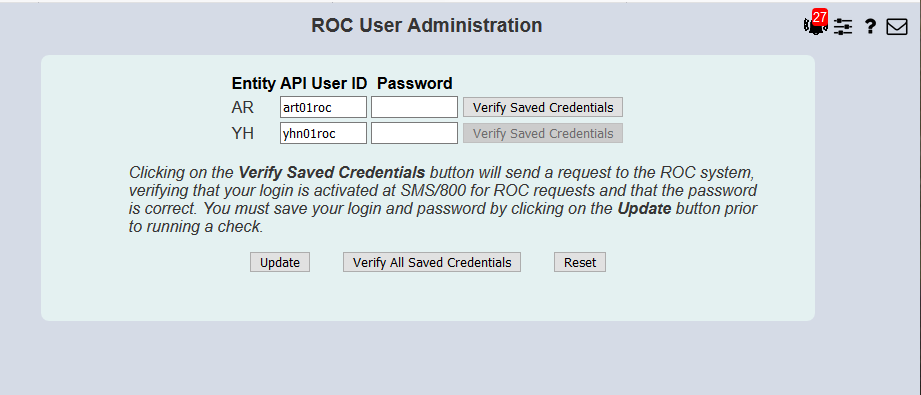
In order to use 8MS to send, view and manage ROC Authorization Requests you must have a valid SMS/800 ROC login and password associated with each Entity for which you will use the ROC feature. The ROC User Administration screen provides the ability to set up this login and password within 8MS.
In the menu frame, select the ROC Admin link located in the System Admin section of the menu. The following will appear in the workspace frame:
To provision your company, you must have a valid Somos login with ROC permissions. If you already have a login on Somos, you may use that one. However, it is strongly recommended that you create a new login that is dedicated to use within 8MS.
If this is the first time a user in your company is setting up their ROC login, there will be one row for each SMS/800 Entity in your 8MS Company, but the Api User ID field for each row will be empty. Enter the API User ID and Password for the appropriate Entity. More than one Entity may be updated in a single request. When done entering API User IDs/Passwords, select the Update button.
If this is not the first time you are setting up your ROC login, the API User ID field will be populated with the current value. While the Password field will appear empty, there is a password saved in the 8MS system but it is not shown on the screen.
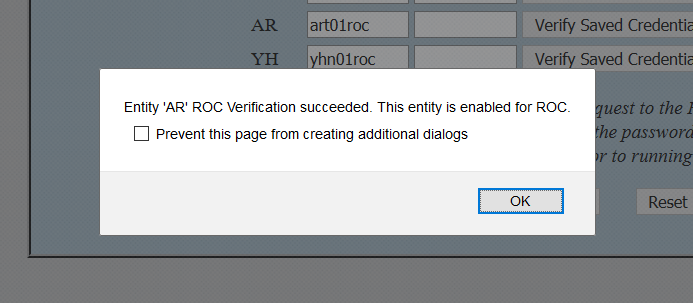
To verify that your Somos ROC login and password are correct, save the values as described above. After performing the save, you may test the login/password pair for a single Entity, by clicking on the Verify Saved Credentials button for a specific Entity. If the login/password pair are valid and are configured for ROC at Somos, you will see a message like the following.
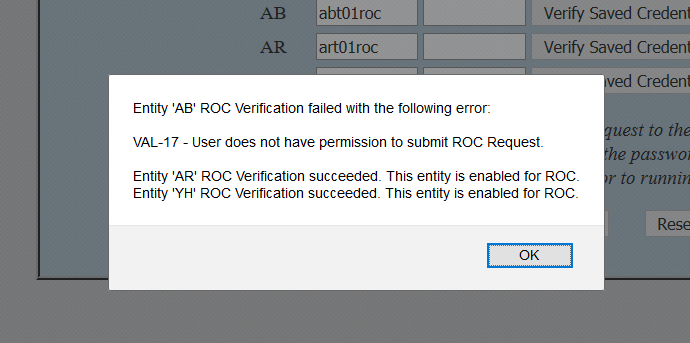
If the login/password pair are not valid or if the specified login is not configured for ROC at Somos, you will see a message like the following.

It is also possible to test the login/password pair for all listed Entities, by clicking on the Verify All Saved Credentials button at the bottom of the screen. You will see a message for each Entity like the following.
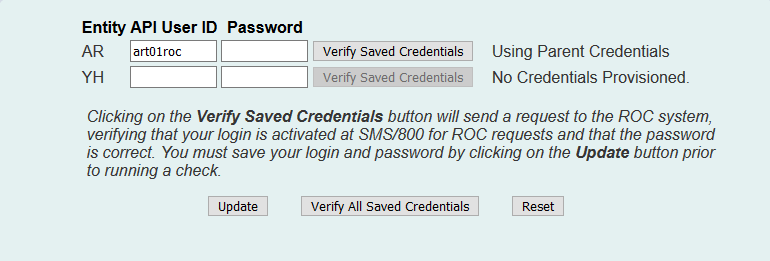
If your company is using their own credentials, a Delete Cred button will appear to the immediate right of the Verify Saved Credentials button, as shown below.

Clicking this button will delete your credential. If your parent has a credential for this entity, you will revert to Using Parent Credentials, otherwise you will revert to No Credentials Provisioned. The Delete Cred button will only be available if you have your own credentials, so you may not delete your parent's credentials.