

-
Saving Modifications: The CPR editor is invoked from
from the Edit Plan button on both
the Record Management: SMS CAD screen and the
SMS Template Management screen or by clicking on
the name of a plan (after specifying a toll-free number)
from the CPR Management screen.
In all cases no changes are stored in the database until the user
explicitly saves the CPR using either Save or Save As.
CPRs can only be saved as local plans.
As discussed in CPR Management,
you cannot change an official plan.
When a local plan is saved, you can specify an expiration date. The local plan will automatically be deleted on that date. The expiration date is specified on the Save As popup:
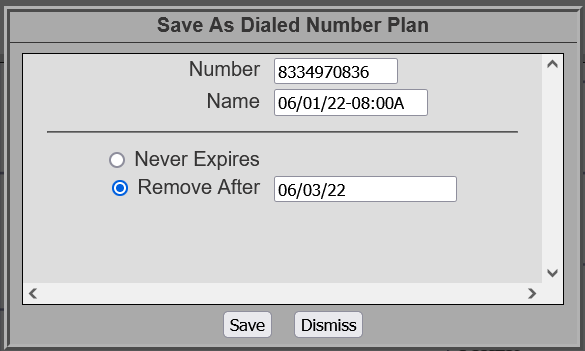
You can specify an expiration date, or select Never expires to keep the plan indefintely.
-
Navigating in the Editor: At any given time, there is a concept of current editing
position.
This is either a node or a branch and is highlighted in yellow.
Other nodes and branches can be selected by either pointing to a new position with the mouse,
navigating with the arrow keys on the keyboard, or by using the
 button to find the next occurrence of a branch label.
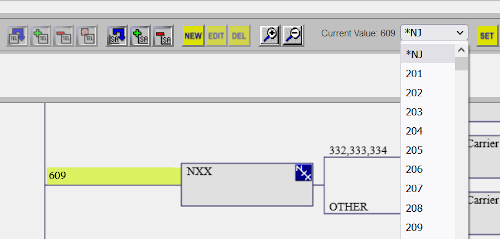
- The Current Value indicator in the upper right-hand corner always represents the highlighted branch value or node type. The drop down menu next to the current value contains a context-sensitive list of values valid for the currently selected branch or node. If a Label is the current value, then the indicator will also state how many times the label appears in the current CPR.
- The box to the left of the current value is an error message window. It contains context sensitive validation errors that relate to the current branch or node. Additionally, a branch or node that has errors will be highlighted in RED.
-
The
 button is used to change all occurrences
of the current branch value (for the specific node type) to the value in the
Current Value drop down.
button is used to change all occurrences
of the current branch value (for the specific node type) to the value in the
Current Value drop down.
- When an editing session starts (with either an add node or an add branch), the editor goes into an auto-build mode which allows the user to quickly build routing paths. During auto-build, the user hits the ENTER or RETURN key after adding each node and branch, and the next path in the tree is automatically added. Auto-Build mode continues until the user either hits the ESCAPE key, or hits ENTER or RETURN on blank branches until the editor has returned to the spot in the tree at which auto-build began.
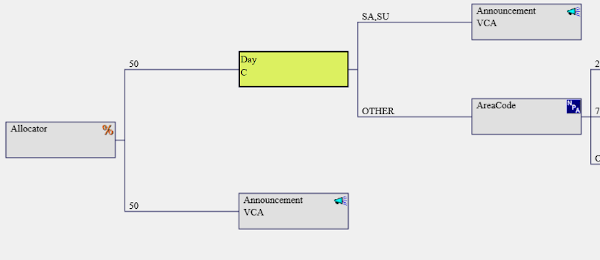
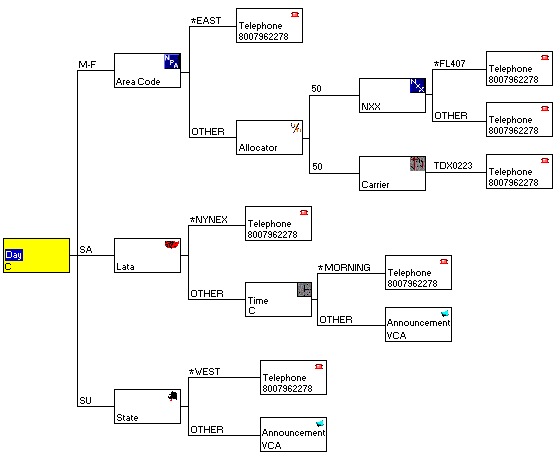
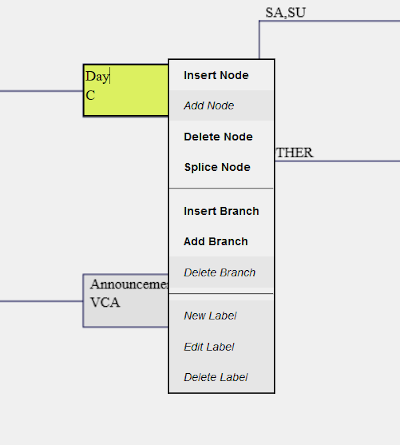
The focus node, a Day node, is child to an Allocator. The user wants to remove the Day node but keep the routing below it intact.
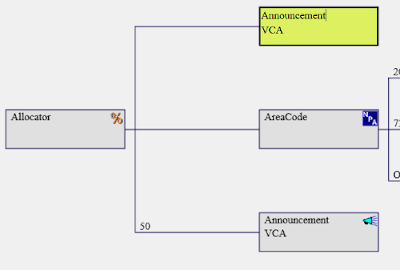
After splicing the Day node, the node and the branch leading in to it are removed and the Day node's two child branches now come directly from the Allocator. These two branches are position exactly where the Day node was located. Note that the two branches that were reparented now have blank values because the Day branch values "SA,SU" and "OTHER" have no meaning to an Allocator node. The user will need to provide meaningful values on these branches. The lower "50" branch of the Allocator remains where it was and its branch value is not modified.
Another case where the Splice Node command is useful is to chop out the root node and move it's child into the root position. The root node may only be spliced if it has a single child. Splicing a root node with multiple children would leave multiple root nodes, something that is not allowed.
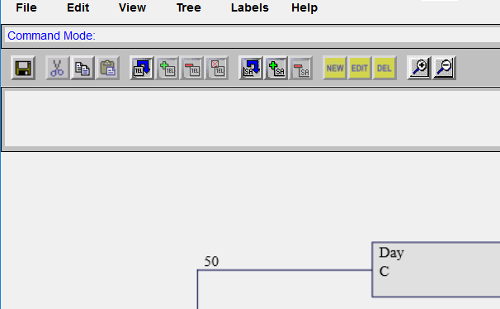
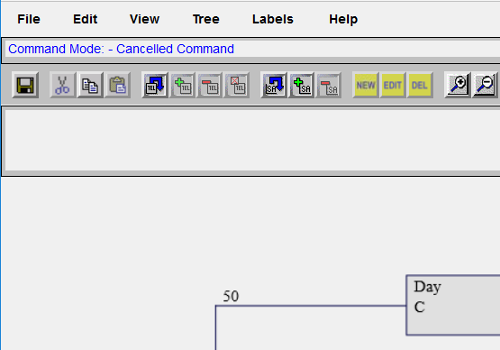
Command Mode provide keyboard-driven commands to execute operations available from the menubar or toolbar. When typing on the keyboard, characters are entered into the node or branch that has focus. Pressing the Escape key puts the user into Command Mode. When in Command Mode, the user may type short strings that execute commands which are normally only available from the menu or toolbar. Pressing the Enter key after the command has been entered will execute that command and then exit Command Mode. If you enter Command Mode by accident, pressing Escape a second time will exit you from Command Mode.
Commands in Command Mode are shown in a new text area located between the Menubar and the Toolbar. The image below shows the Command Mode area immediately after a user has pressed the Escape key.
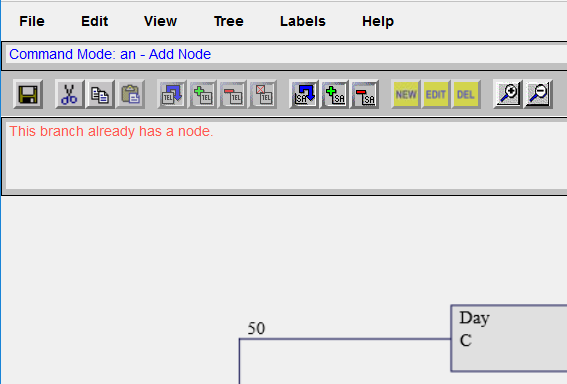
Had it been legal to add a node off the current focus branch, a new node would have been added. In this case, however, the focus branch already had a node, so an error is shown instead. This demonstrates another feature of Command Mode. Buttons are dimmed when a command is not available, but for typed commands, feedback is provided if the command is invalid in the current context.
Below is the list of Key Commands available in Command Mode, their equivalent button command, and a brief description of what the command does.
A context-sensitive choice list is available on the upper right of the editor, as shown in the screen shot below.
This choice list is populated with a set of values for the field that currently had focus. If focus is on the node type field of a Node, this list containes all node types. If focus is on a branch, this list contains all labels whose type matched the branch's parent node type and also contains the value "OTHER". In addition, if focus is on a branch off of a geographic node such as State, Lata, or Area Code, the geographic values (e.g. all states) are also available, but only if that list of values is a reasonably limited set of values. Specifically, all State, Lata and Area Code choices are available in this list. NXX, SixDigit and TenDigit values, since these lists are extremely large, are not available.
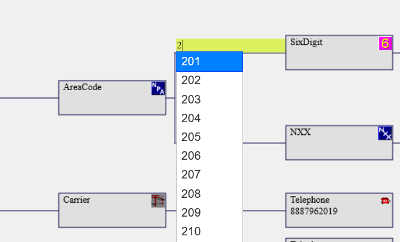
In addition to the choice list on the upper right, another choice list is available to speed up data entry. This list will appear immediately below the node/branch field that has focus. As you type, this list automatically reduces itself to all matching values until you reach a single value. When the list has a single item, pressing the Enter key will enter that value into the field. An AreaCode choice list example is shown below.
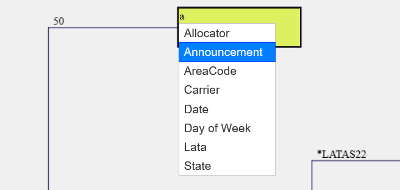
Users should be aware that the choice list matching for these choice lists does not match items in the list that start with the typed letters but instead matches ANY string containing the letters typed by the user. For example, if focus is on the node type field and the user types "a" it matches all node types that contain an "a", not just those node types that start with an "a". Thus, the list would contain Allocator, Announcement, AreaCode, Carrier, Date, Day of Week, Lata and State rather than just Allocator, Announcement and AreaCode. The screen shot below shows this example.
Traditionally, a copy buffer allows users to cut and copy to a buffer and then paste the contents of that buffer somewhere else. In editplan, this has been extended to allow users to
- View the contents of the buffer as a graphical tree
- Save the contents of the buffer as a new local CPR
- Open an existing CPR and store it, or a subtree of it, into the buffer

This dialog is read-only; the copy buffer CPR may not be edited in any way. The toolbar, context menu and command mode are not available, but the dialog does provides a menu bar with a subset of the commands normally available, as shown below.
- Import Dialed Number Plan, Import SMS Template Plan, Export Dialed Number Plan, Export SMS Template Plan
- Graphical, Balanced, Zoom In, Zoom Out, Fit to Window, Normal View, View Labels
Skipping over the menu for a moment, the menu provides commands for toggling between graphical and non-graphical as well as balanced and non-balanced. The four zoom commands are also available. The final button on the menu is the View Labels button, which provides the ability to view label definitions for the CPR in the Copy Buffer.
The menu on the View Copy Buffer dialog provides the ability to import a plan into the Copy Buffer and export the Copy Buffer as a local plan. Importing a plan uses the two Import commands and the area at the bottom of the dialog, as shown below.

To the left of the Import to Copy Buffer button is the label Import from and two radio buttons labeled Root and Selected. These radio buttons are used to specify what portion of the plan will be written to the Copy Buffer. By default, the entire plan is written as specified by the Root button being selected. To import a portion of the current plan rather than the entire plan, click on a node so that it highlights in yellow and then check the Selected radio button to indicate this will be the root of the imported plan. Now select the Import to Copy Buffer button. The Copy Buffer will be overwritten with the subtree beginning with the selected node rather than the root node.
The Import from radio buttons provide a second function; they allow the user to select a subtree from the current Copy Buffer. To do this, open the View Copy Buffer dialog, select the node of the subtree desired, check the Selected button and then select the Import to Copy Buffer button. This modifies the current Copy Buffer subtree.
To export a plan from the Copy Buffer back to 8MS, select the Export Dialed Number Plan or Export SMS Template Plan button. These buttons behave like the Save-As Dialed Number Plan or Save-As SMS Template Plan buttons and will save the Copy Buffer as a local plan.
Highlighting provides the ability to select one or more paths and show the node and branch lines in a different color, (green by default). This is intended to allow you to focus your view on these particular paths for debugging call routing and makes group discussion easier. A highlighting example is shown below.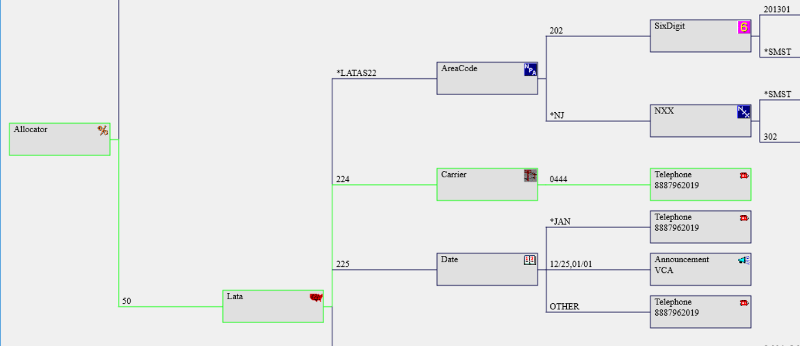
-
From the menu, clicking
on the Highlight this Path
button highlights this node, all it's children and it's
path to the root node.
To highlight a single path, go to the leaf node and then click the Highlight this Path button. - From the menu, clicking on the Unhighlight this Path button turns off highlighting for this path and all it's children. Parent nodes are left highlighted if the current node has siblings.
- From the menu, clicking on the Unhighlight Tree button turns off all highlighting in this tree.
When pasting CPR and/or label data, it is possible there will be conflicting label names (that is, labels copied from the first plan that also exist in the second with the same type and different values). If conflicts exist, the following popup will be presented to help the user resolve the conflicts:
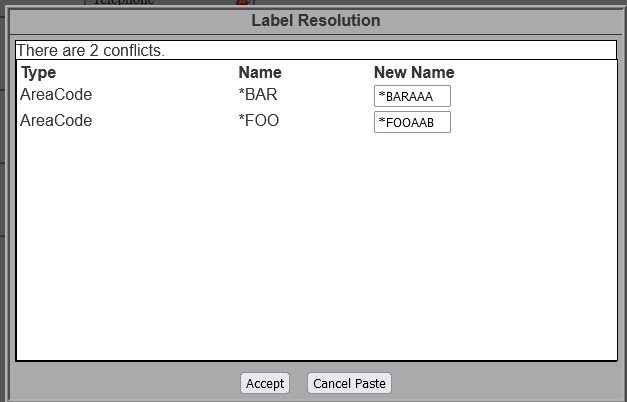
This screen shows the labels in conflict, along with their type. The New Name column suggests a new, unique name for each conflict. The user can replace the suggested names as desired and hit the Apply button. If there are conflicts with the newly supplied names, the popup will appear again. Otherwise, the imported labels are pasted into the current CPR.
A dialog is available that allows you to view your label definitions outside of the individual Label Editors. To access this dialog, go to the menu on the Menubar and click the View Labels button. The View Labels dialog will appear as shown below.
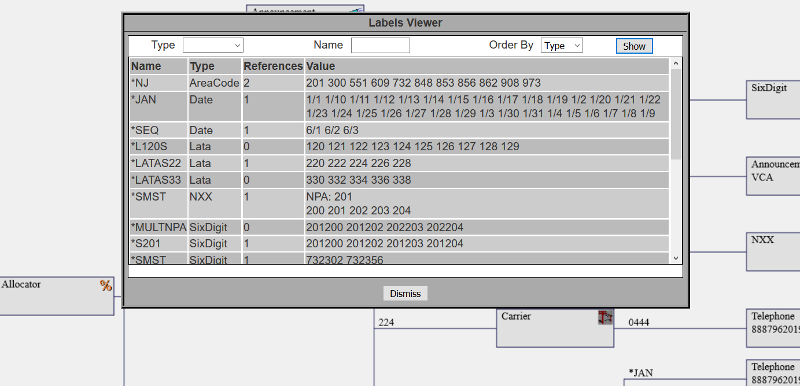
Labels may be filtered by type or by name. They may also be ordered by type (and then name) or by name (and then type). After specifying any filtering or ordering, select the Show button and all matching labels will be shown in the scrolling section below the filters area.
Maintenance of the LAD portion of a customer record is accomplished within the CPR editor. Labels can be created for any node type that accepts a label name as a branch value. All label names in SMS/800 must start with a *, followed by 1 to 7 additional characters.
8MS provides label editors that allow values to be associated with labels. Each label editor has its own unique appearance and behavior. For example, the LATA label editor allows LATAs to be selected, the Area Code label editor allows NPAs to be selected, etc. After selecting the desired values for the label, hit the Save button to save the label changes.
Label editors appear as new (popup) windows. Each label editor is described in detail below. There are two ways to invoke a label editor:
-
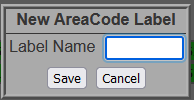
Use the
 button to create a new label.
The label editor will be invoked with no current label name, and no values selected.
After selecting appropriate values, hit the Save As... button.
A popup will appear requesting that the name of the new label be entered.
(Hitting the Save button will act like Save As... and bring
up the same popup.)
NOTE: if the name of an existing label is entered, its values will be overwritten.
button to create a new label.
The label editor will be invoked with no current label name, and no values selected.
After selecting appropriate values, hit the Save As... button.
A popup will appear requesting that the name of the new label be entered.
(Hitting the Save button will act like Save As... and bring
up the same popup.)
NOTE: if the name of an existing label is entered, its values will be overwritten.
-
Use the
 button after selecting a label name on a branch.
If the label is currently defined, its current value(s) will be shown in the label editor.
The label need not exist to use the button.
A new label name can be typed on a branch, and the
button selected.
This will invoke the label editor for the named label with no initial values.
This is a way to create a new label without using the
button.
button after selecting a label name on a branch.
If the label is currently defined, its current value(s) will be shown in the label editor.
The label need not exist to use the button.
A new label name can be typed on a branch, and the
button selected.
This will invoke the label editor for the named label with no initial values.
This is a way to create a new label without using the
button.
In addition to the label editors, there is another form of label creation which allows bulk creation of labels. Multiple labels can be created by typing or pasting data and clicking a few buttons. This is discussed below, in the section Label Builder.
To delete a label, it cannot be in use.
A label currently in use anywhere in the tree will automatically be saved with the CPR;
it cannot be deleted.
Thus, to delete a label, first change all branches that use the label to new values.
After changing the last branch, the label name should still be selected in the
Current Value drop-down.
(If not, make sure the current position is on a branch of the desired label type.
The unused label should then be on the Current Value list.)
Once the label to be deleted is selected from the list, hit the
![]() button (or select
Label -> Delete from the Edit menu).
button (or select
Label -> Delete from the Edit menu).
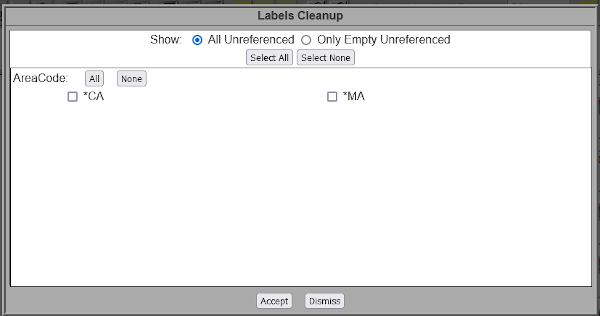
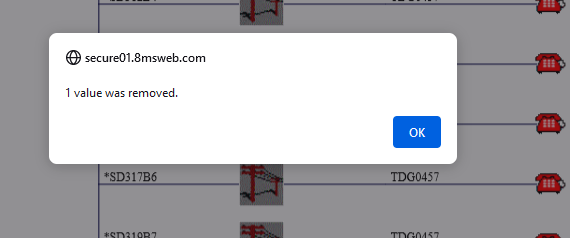
A means to remove all unused labels in one operation is provided. Select Cleanup Labels from the Labels menu. This examines the current CPR, looking for unused labels. If any exist, the following popup window appears:
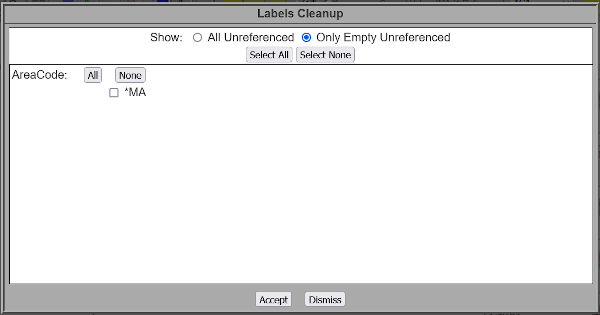
The popup shows unused labels in the current CPR. Select the labels to be deleted, and hit the Accept button. Use the All and None buttons assist in the selection. By default, the popup shows empty, unused labels (that is, labels with no associated value). Selecting All unreferenced labels will also show labels that are unused, but have values:
A tool to remove all invalid values from labels is provided. Select Cleanup Label Values from the Labels menu. This examines the current CPR, looking for label values that have been marked invalid. If any exist, the following popup window appears:

The popup shows all invalid values found in labels. For example, the first entry on the screen above indicates that in the label *004, there are two invalid NXXs (386, 417) listed for NPA 202. Select the label values to be deleted, and hit the Accept button. Use the All and None buttons assist in the selection. By default, the popup shows empty, unused labels (that is, labels with no associated value). Upon selecting the Accept button, the following confirmation appears:
Below is an example of a Label Editor, to show the features generally available in all Label Editors.
Each label editor has a set of common buttons across the bottom of the dialog.

| Button | Description |
|---|---|
| View |
This button allows the contents of a label to be viewed in a
popup window.
The area containing the label values may be selected,
and copied/pasted into into another application.
|
| Save |
This button saves the contents of the current label. If the
label builder was invoked from the
|
| Save As... |
Selecting this button brings up the Label Save As popup.
 |
| Cancel | Selecting this button dismisses the label builder popup without saving anything. |
Most label editors have an additional set of common buttons to make it easier to view a large collection of values. These are located between the label values (main area) and the bottom row of View/Save/Save As/Cancel buttons.

| Button | Description |
|---|---|
| Select All | Selecting this button selects all values. If a label will contain most available values, clicking this button and then unselecting the individual unwanted values may be faster than just selecting the desired values. |
| Select None | Selecting this button unselects all values. |
| Invert Selected | Selecting this button swaps the selected and unselected values. Selected values become unselected and unselected values become selected. |
| Hide Unselected Choices | Selecting this button hides all values that have not been selected. |
| Hide Selected Choices | Selecting this button hides all values that have been selected. |
| Show All Choices | Selecting this button shows all values, effectively undoing any previous Hide actions. |
A third set of common controls is available on most Label Editors, located at the top of the dialog. These controls are intended to make a large set of possible values easier to manage.

| Button/Field | Description |
|---|---|
| find text field | The find field, located in the center of the upper portion of all Label Editors, accepts multiple values, separated by a comma or a space. It is used by the three buttons located to the right of the field. |
| Find | Clicking this button causes all matching values to be highlighted. |
| Select | Clicking this button causes all matching values to be highlighted. |
| Unselect | Clicking this button causes all matching values to be unselected. |
|
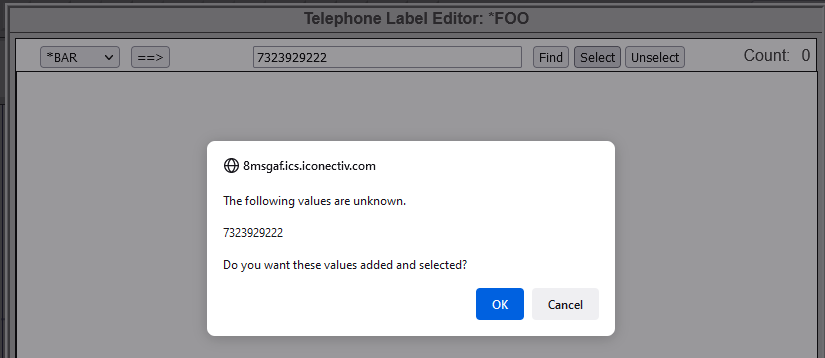
If any values in the find field
do not exist, the user is given the option
to add those unknown values as buttons in the main
(label values) area. After clicking any of the buttons
Find,
Select, or
Unselect
a confirmation window will appear, as shown below.
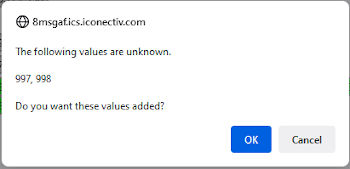 After being added, the action selected takes effect on those newly added values, i.e. Find highlights the values, Select selects them and Unselect adds them without highlighting or selecting them. |
|
| Label List | This drop-down list contains all labels of this node type that are associated with this CPR. |
| ==> |
Selecting a label from the label drop-down to the
left of this button and then clicking this button will
copy all values from the selected label into the
find field.
Users may then click any of the Find, Select, or Unselect buttons. |
| Count | The read-only Count field shows the number of selected values. |
Values in a label editor are selected and unselected by clicking on the individual values. In some cases, label values are shown in groups, with group titles, to provide a logical view of the values. Clicking on a group title selects and unselects all values in that group.
Colors are used to indicate the state of individual label values. Unselected values have text in black and a gray background. Selected values have text in black and a green background. To illustrate grouped label values, consider the following two examples:
Area Code values are grouped by state.
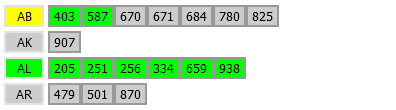
Date values are grouped by month.

These examples are shown to highlight color meanings. Individual selected values are shown in green. If values are grouped, the group title is shown in green if all values in that group are selected. The group title is shown in yellow if some, but not all, values in that group are selected. For the Area Code example, the group title AB is shown in yellow because only the first two values are selected, while the group title AL is shown in green because all values in that group are selected. For the Date example, the group title Jan is shown in yellow because only five values are selected, while the group title Feb is shown in green because all values in that group are selected.
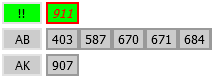
Invalid values are shown with the text in red, as shown below in a LATA example. Unselected invalid values have text in red and a gray background.

Selected invalid values text in red and a green background.

Invalid label values are those that are not currently known in the telephony network. As an example, 911 cannot be a valid area code. Where label values are grouped, invalid values will be shown at the top of the list of values, with a group title of !!, as shown in the Area Code example below.
SMS/800 supports labels for 9 node types: Area Code, Date, LATA, NXX, Six Digit, State, Ten Digit, Telephone and Time. Telephone labels are used in the node-specific data area; all other label types are used on branches. 8MS provides a label editor for each. They are described below.
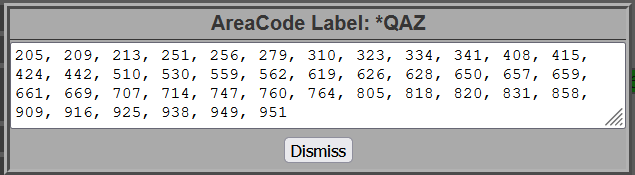
Area Code
Below is a screenshot of the Area Code label editor:
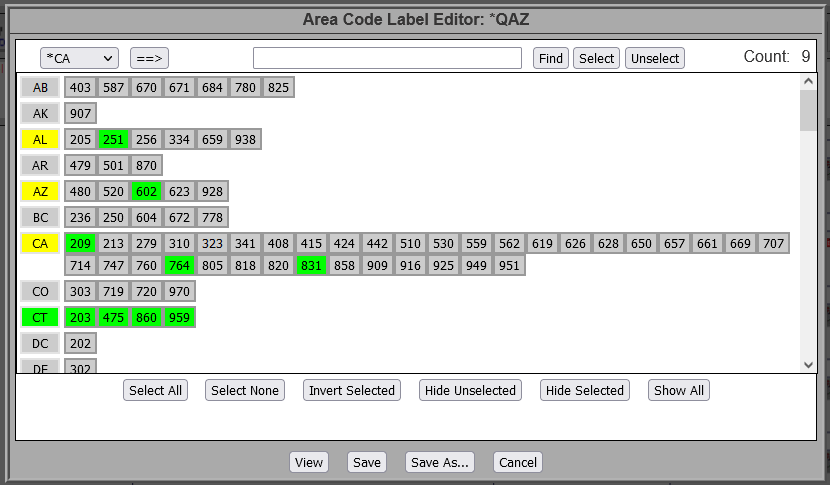
This label editor contains all features discussed above in the section Label Editor Common Features.
Date
Below is a screenshot of the Date label editor:
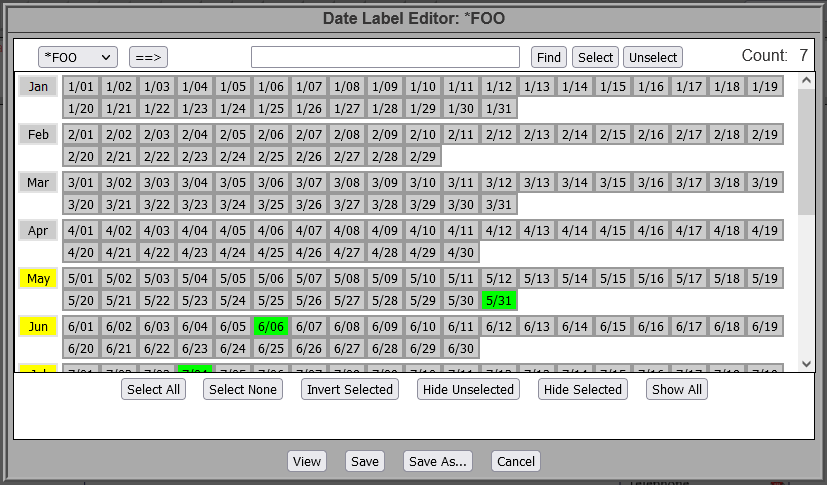
This label editor contains all features discussed above in the section Label Editor Common Features.
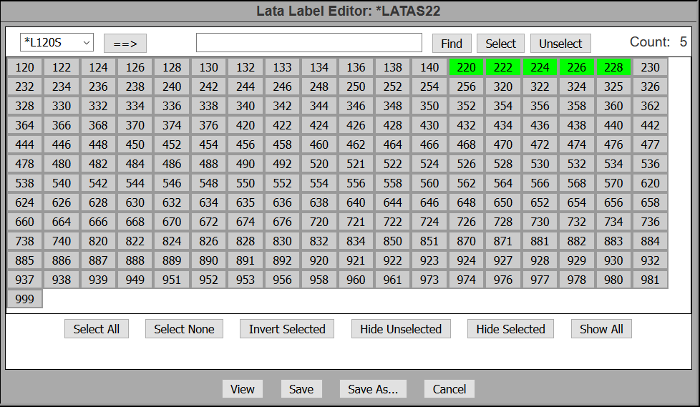
LATA
Below is a screenshot of the LATA label editor:
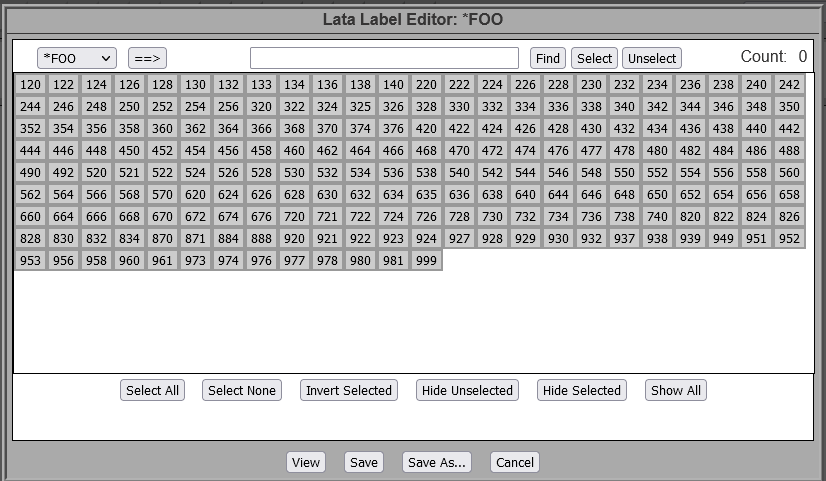
With the exception of grouping of label values, this label editor contains all features discussed above in the section Label Editor Common Features.
NXX
Below is a screenshot of the NXX label editor:
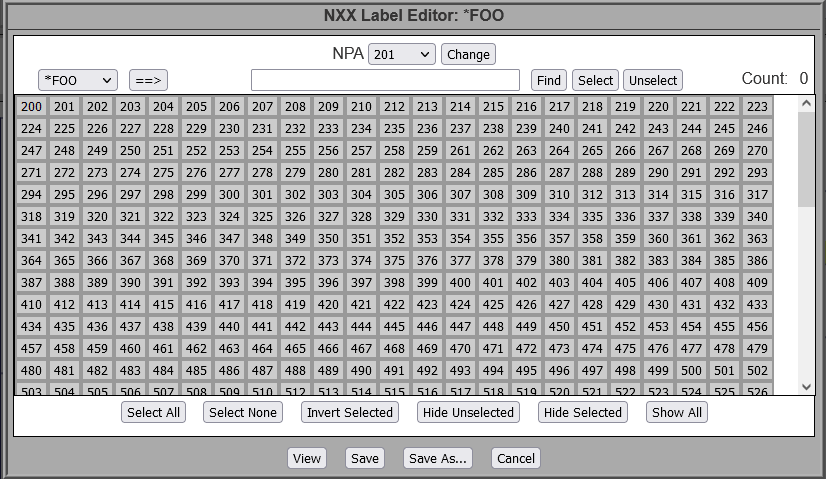
With the exception of grouping of label values, this label editor contains all features discussed above in the section Label Editor Common Features.
NXX labels contain values for a single NPA. The set of values shown in the dialog is based on the NPA selected. The default NPA selected when creating a new NXX label is 201, the first valid NPA. If a different NPA is desired, select it from the NPA drop-down list and then click the Change button, as shown below.
All current selections will be discarded, and the valid NXXs for the newly selected NPA will be displayed.
Six Digit
Below is a screenshot of the Six Digit label editor:
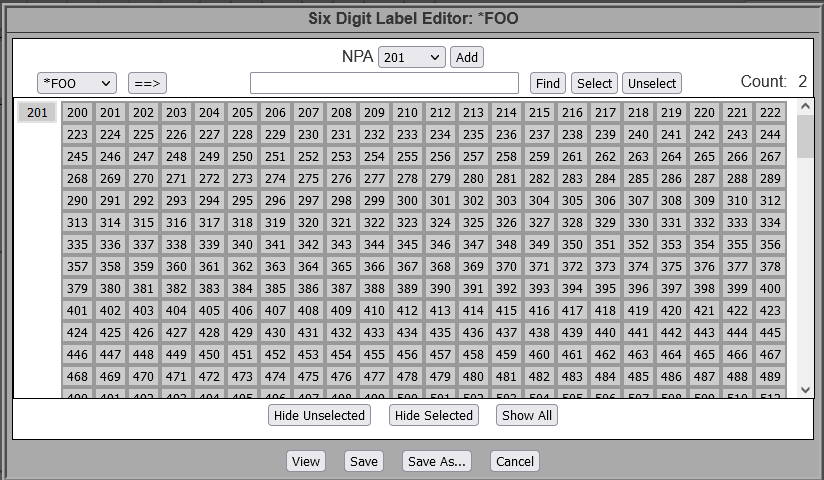
This label editor contains all features discussed above in the section Label Editor Common Features. NXXs are grouped by their NPA.
Six Digit labels contain values for one or more NPAs. Each individual value is composed of a 3 digit NPA and a 3 digit NXX. The Six Digit label editor shows NXXs, grouped by their NPA, sorted in NPA numeric order. If one or more NXXs for some NPA are selected, all NXXs for that NPA are shown, followed by the next NPA with one or more NXXs selected.
Only NPAs that have one or more NXXs seleted are shown in the main work area. When creating a new Six Digit label, the label editor starts out with no values in it.
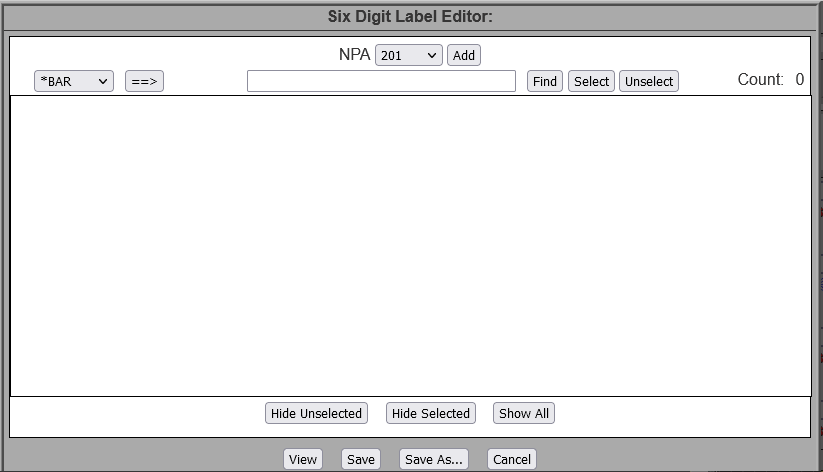
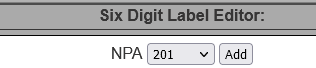
To add an NPA and its NXXs, select the NPA from the NPA drop-down list and then click the Add button, as shown below.
All NXXs for that NPA will be added, grouped by the NPA. When adding additional NPAs, the dialog will automatically scroll so that the newly added NPA is shown at the top of the dialog.
After multiple NPAs have been added to a Six Digit label, it can be cumbersome to find particular NPA/NXX pairs to select. Using the find field and its associated Find, Select, and Unselect buttons will make it easier to find, select and unselect specific six digit values. When any of these buttons are clicked, the dialog will automatically scroll so that the numerically first value in the find field scrolls into view. If multiple different NPAs are specified in the find field, clicking the Find button will scroll to the numerically first value, whereas clicking the Select or Unselect buttons will scroll to the numerically last value. The reason for the difference is that the select and unselect buttons are performing work on the values, whereas the find button is just searching. Scrolling to the numerically last value for a select or unselect action indicates that the other values were also selected or unselected.
State
Below is a screenshot of the State label editor
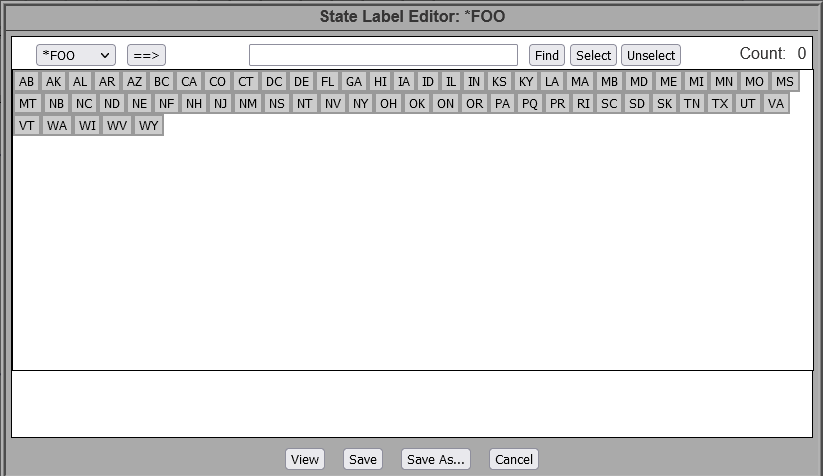
With the exception of grouping of label values, this label editor contains all features discussed above in the section Label Editor Common Features.
Ten Digit
Below is a screenshot of the Ten Digit label editor:
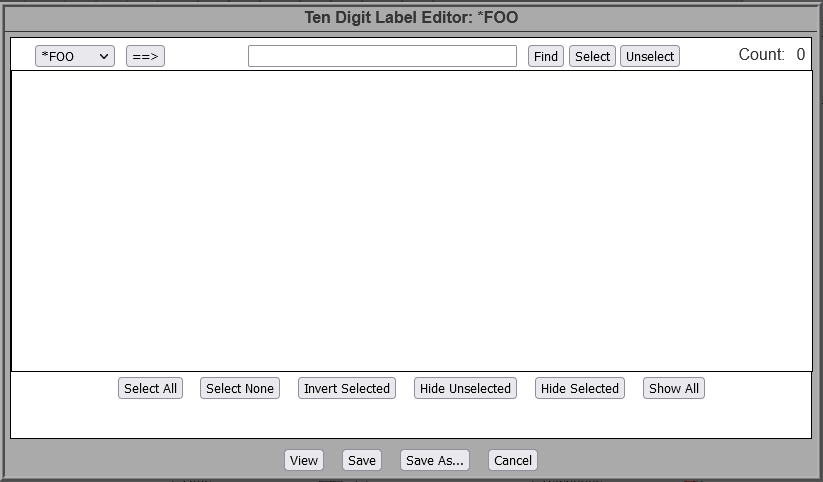
With the exception of grouping of label values, this label editor contains all features discussed above in the section Label Editor Common Features.
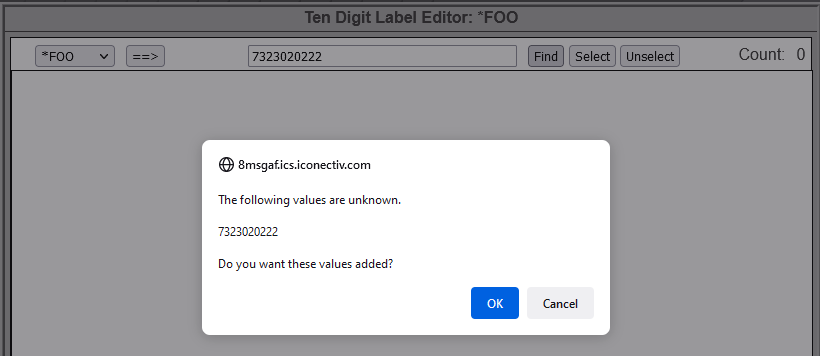
Unlike the other label editors, the Ten Digit label editor starts out with no values in it. To add a number, type the ten digits in the find field and click the Find or Select button. A confirmation window will appear, as shown below.
To remove a number from the label, unselect the number. It will turn gray, and will not be saved with the label when Save is clicked.
Telephone
Below is a screenshot of the Telephone label editor:
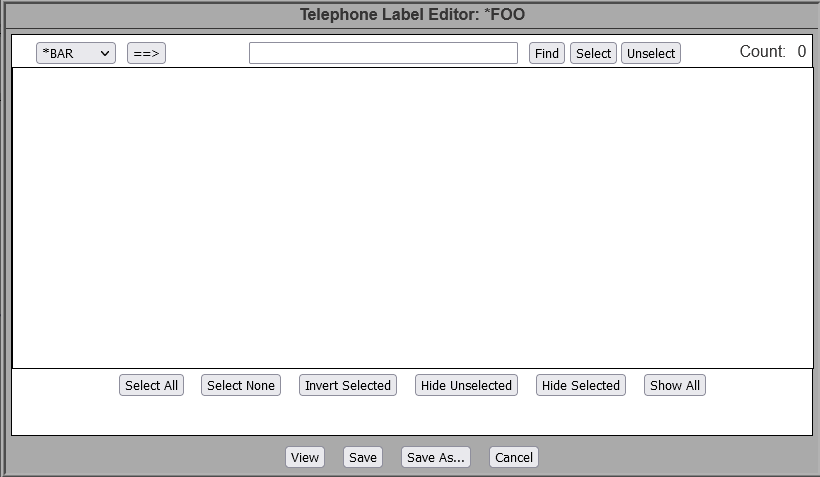
With the exception of grouping of label values, this label editor contains all features discussed above in the section Label Editor Common Features.
Unlike the other label editors, but similar to the Ten Digit label editor, the Telephone label editor starts out with no values in it. To add a toll-free number, type the ten digits in the find field and click the Find or Select button. A confirmation window will appear, as shown below.
To remove a number from the label, unselect the number. It will turn gray, and will not be saved with the label when Save is clicked.
Time
Below is a screenshot of the Time label editor:
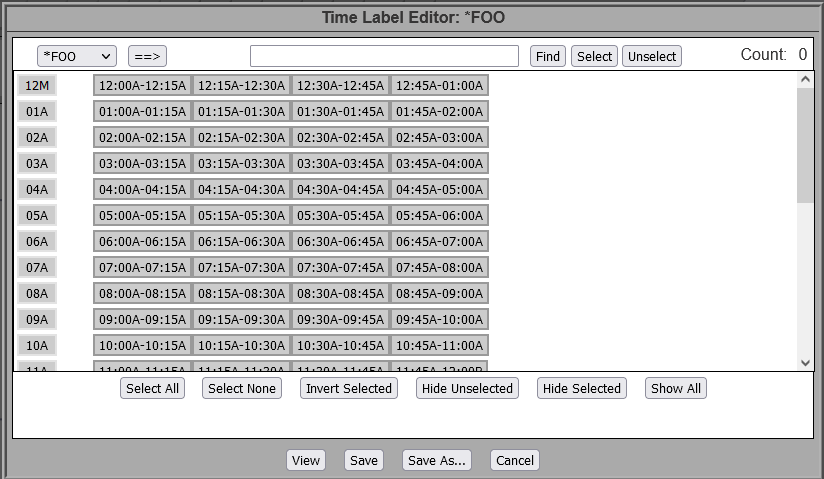
This label editor contains all features discussed above in the section Label Editor Common Features. 15 minute interval time values are grouped by their hour and meridiem (A/P).
The table below describe each node type, its valid values, and the valid branch values:
| Node Type | Valid Node Values | Valid Branch Values |
|---|---|---|
| Allocator | N/A | Number from 1-99 |
| Announcement | OBA or VCA | N/A |
| AreaCode | N/A | Three area codes, a label name, or OTHER |
| Carrier | N/A | CIC or ACNA-CIC |
| Date | Time Zone Indicator | Specific Date (mm/yy), a label name, or OTHER |
| Day | Time Zone Indicator | Su, M, Tu, We, Th, F, Sa or OTHER |
| LATA | N/A | Specific LATA, a label name, or OTHER |
| NXX | N/A | Specific NXX, a label name, or OTHER |
| Six Digit | N/A | Specific NPANXX, a label name, or OTHER |
| State | N/A | Specific state abbreviation, a label name, or OTHER |
| Switch | N/A | ON, OFF |
| Telephone | Toll free or POTS # | N/A |
| Ten Digit | N/A | Specific 10 digit number, a label name, or OTHER |
| Time | Time Zone Indicator | Specific time range (e.g., 11:00A-01:00P), a label name, or OTHER |
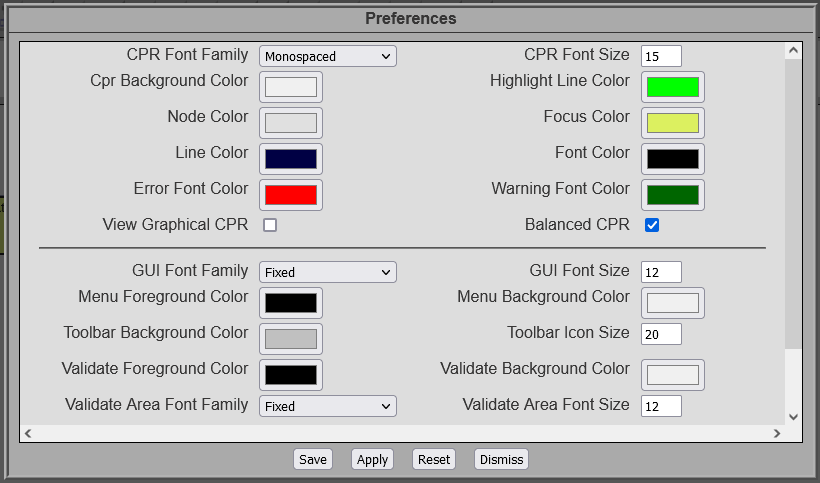
Changes may be applied in 2 different ways.
- The Apply button saves changes for this instance of EditPlan. When you exit, all preference changes are thrown away.
- The Save button saves changes for this instance and also saves the preferences in your 8MS settings. When you exit, these preference changes are retained and will be used the next time you bring up the editor.
Before you've clicked the Apply or Save button you may throw away all changes by doing one of the following.
- Click the Reset button. This leaves the Preferences dialog up but sets all preferences back to their initial values.
- Click the Dismiss button. This will take down the Preference dalog without committing any changes.
| Section | Customization |
|---|---|
| CPR | The colors for the CPR section affect the lines, boxes, node/branch text, node/branch error text, and dialog background. The checkboxes are related to the Graphical and Balanced buttons available from the View menu on the menubar. As discussed above, you can also change the font and size. Be cautious when changing the font! |
| Menubar | The colors for the Menu affect both the menubar and the context-sensitive menu available by clicking right on a node or branch. |
| Toolbar | For the toolbar, you can change the background color and you can increase or decrease the size of the icons. Since the icons are square, only a single size value is needed to be specified. |
| Validation Feedback | The Validation Feedback area is the box below the Toolbar. Background and foreground colors may be modified, as well as the font and size. |