| 8MS User Guide |
SMS Template Management |
Main Help Page |
This screen allows you to view, create and update SMS Templates (Template Administrative Data or TAD in SMS/800 terminology). SMS Templates define the routing used by toll-free numbers; toll-free numbers point at an SMS Template to specify how to route their calls.
In the menu frame, select the Template Mgmt link located in the SMS Templates section of the menu.
The screen is divided into two main areas:
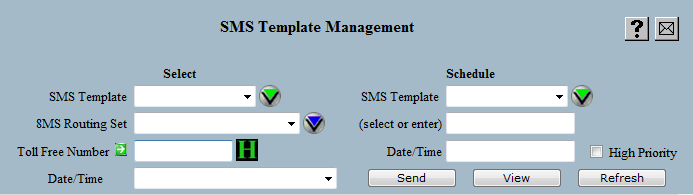
The top section of the Template Management screen appears as follows:
At any point you have the option of populating the routing and service area from an existing record. The record may be selected either by choosing an SMS Template from the SMS Template list, an 8MS Routing Set from the 8MS Routing Set list, or by entering a toll-free number using the Toll Free Number field. These are the fields located in the left-hand Select column. Alternatively, an item need not be selected, and the SMS Template information can be entered "from scratch."
If a toll-free number or SMS Template is selected as the source, the Date/Time list will automatically be populated with all records for that number or SMS Template. A record will be automatically selected and the data associated with that record will be displayed in the scrollable lower area. The record selected is chosen in the following order: ACTIVE, SENDING, most recent PENDING, or most recent OLD.
As mentioned above, the SMS Template information is divided into two sections. The first contains routing information, and appears as follows:

For a description of each of these fields, see Number Information.
The second section contains Service Area information, depicted in the following:
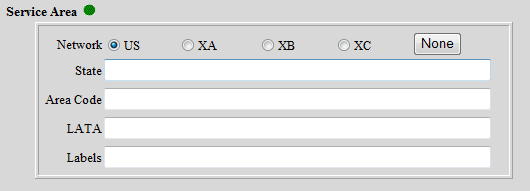
The Service Area defines the region(s) from which a toll-free number will receive calls. You have the option to define the Service Area by Network, State, LATA or Area Code. For a detailed description of each of these fields, see Service Area.
Once the desired information has been specified, and (optionally) a CPR selected, the target customer record information is entered. This is done using the SMS Template and Date/Time fields in the right-hand Schedule column at the top of the screen.
Specifying the Schedule SMS Template may be done by either selecting the name from the SMS Template drop-down list or by typing the name in the field labeled (select or enter).
The SMS Template name must be 4-15 characters long, the first character must be a '*', the second and third characters must be your company's SMS/800 Entity code (the first two characters of the RespOrg) and all other characters must be alphanumeric or dashes.
In the Date/Time field, enter the effective date and time on which the customer record should become active. The format of this field is MM/DD/YY HH:MMa/z, where a is A or P, and z is the time zone. Time zone is optional and is presumed to be Central time if omitted. The time is also optional. If a date is entered without a time, then SMS/800 will schedule the activation sometime on the requested date. The keyword NOW can also be used to activate the record immediately.
Below the Date/Time field is the High Priority checkbox. This checkbox provides access to the SMS/800 High Priority Update feature. Selecting this option will tell SMS to place this customer record at the front of the SCP queue. Only a small number of these updates can be done each day. After a high priority change is sent, check the Activity Log to see how many such updates remain for the current day.
Select the  button in the non-scrollable area at the top of the screen.
A message will appear in the response frame
(the area below the scrollable Routing Information/Service Area information)
indicating the status of the request.
button in the non-scrollable area at the top of the screen.
A message will appear in the response frame
(the area below the scrollable Routing Information/Service Area information)
indicating the status of the request.
It is possible that the SMS Template you are currently viewing
has been modified by another user or by the system.
Select the  button to force the screen to repopulate all data for the currently
selected SMS Template.
button to force the screen to repopulate all data for the currently
selected SMS Template.
 image to the right of the field will produce a popup containing the
change history of the selected number. For more information, see
Number History.
image to the right of the field will produce a popup containing the
change history of the selected number. For more information, see
Number History.
 .
Clicking on this image will produce a popup containing the latest
SCP status information for this particular toll-free number's record.
For more information, see
SCP Status.
.
Clicking on this image will produce a popup containing the latest
SCP status information for this particular toll-free number's record.
For more information, see
SCP Status.
 button.
For a description of the report and its associated popup, see
Toll Free Number/8MS Routing Set Report.
button.
For a description of the report and its associated popup, see
Toll Free Number/8MS Routing Set Report.