| 8MS User Guide |
ROC Submit Request |
Main Help Page |
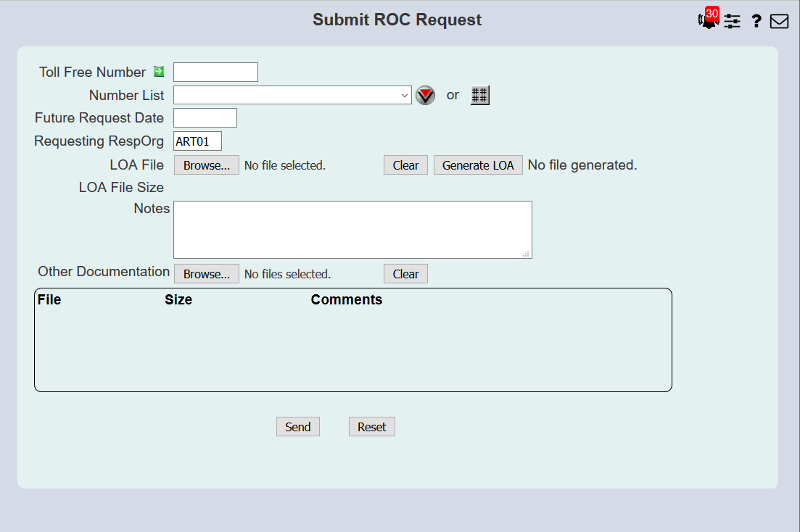
This function allows you to submit ROC Authorization Requests. request.
In the menu frame, select the ROC Submit Request link located in the Number Admin section of the menu. The following will appear in the workspace frame:
| Field | Description |
|---|---|
| Toll Free Number |
If this authorization request will contain a single
number, enter that number here.
Only one of Toll Free Number, Number List,
|
| Number List |
If this authorization request will contain multiple
numbers, select the Number List that contains
the numbers you are requesting.
Only one of Toll Free Number, Number List,
or
|

|
If this authorization request will contain multiple
numbers, you may create a
Dynamic List of Numbers
by entering them in the Dynamic List of Numbers
popup associated with this button. See the
Dynamic List of Numbers
section of
Choice Lists for details on
this button and how to use it.
Only one of Toll Free Number, Number List,
or
|
| Future Request Date |
To schedule this authorization request for a future
date, specify that date here. The request will be sent
to SMS/800 and saved there until that date has been reached.
At that point, the authorization request will be sent
to the controlling Resp Org.
The format of this field is MM/DD/YY.
The vast majority of the time, users do not set a
Future Request Date. Somos then immediately sends the
ROC request to the controlling Resp Org.
Providing a Future Request Date means Somos will create the ROC request but will not send it to the controlling Resp Org until the day of the Future Request Date. This means the controlling Resp Org won't be able to see the request, or respond to it, until the date you specified. We strongly recommend that you do not set the Future Request Date parameter unless you fully understand what this means. |
| Requesting Resp Org |
The Resp Org asking for control of this group of numbers.
A default Resp Org may be populated. This is controlled by the preference RocDefaultResporg. |
| LOA File |
A document that provides proof that the
Requesting Resp Org has the right to ask for
control of this number.
To the right of the LOA File file selector is the Clear button. Clicking this button will clear the selected file.
File names may only contain
|
| Generate LOA |
Generate the document that provides proof that the
Requesting Resp Org has the right to ask for
control of this number.
Clicking this button will display the Create a new LOA File dialog. To the right of the Generate LOA button, the generated file will appear as a link. Clicking on this document will cause your browser to open the document in your standard way, depending on your operating system and browser settings. The document can be downloaded and saved locally. |
| LOA File Size | This field is read-only. When a LOA File has been selected, the size of the file will be shown in this field. |
| Notes | Any additional notes that may help the controlling Resp Org to verify and process the authorization request. |
| Other Documentation |
Any additional documents that may help the controlling
Resp Org to verify and process the authorization request.
Multiple documents may be selected.
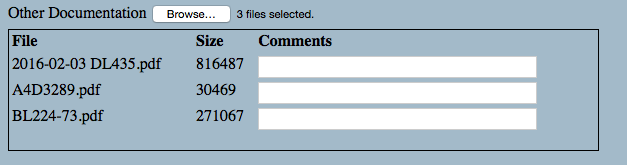
Once the documents have been selected, the box below this field will be populated with the names of the files, the size of each file and a Comments field. Enter any additional comments next to each file if this will help the controllilng Resp Org when processing the authorization request. To the right of the Other Documentation file selector is the Clear button. Clicking this button will clear out any selected files. |
Below is an example of file information after a user has selected several Other Documentation files. Note the size of the files and the Comments field to the right of each file. Comments are required for every file as they aid in identifying how each file supports the authorization request.
After specifying the toll-free number(s) and associated data,
select the  button.
A popup will appear over the main screen, showing the status of the request.
Unlike most 8MS screens, this screen may send multiple messages to SMS/800,
one for the authorization request itself and one for each additional
document specified in the Other Documentation list. Since SMS/800
has a limit on the total size of all documents that may be uploaded, it
is possible for one document to fail to upload but others to successfully
upload. An example of this is shown below. Even though the first file
failed to upload because of its size, the remaining files successfully
uploaded. Failing to upload a document does not stop uploading of
additional documents.
button.
A popup will appear over the main screen, showing the status of the request.
Unlike most 8MS screens, this screen may send multiple messages to SMS/800,
one for the authorization request itself and one for each additional
document specified in the Other Documentation list. Since SMS/800
has a limit on the total size of all documents that may be uploaded, it
is possible for one document to fail to upload but others to successfully
upload. An example of this is shown below. Even though the first file
failed to upload because of its size, the remaining files successfully
uploaded. Failing to upload a document does not stop uploading of
additional documents.
To create a LOA document, select the Generate LOA button. The Create a New LOA File dialog will appear, as shown below.

An entry is required for all fields except Company Address2, Authorized Customer Extension, and Authorized Customer Fax.
Click on Create File to send request to generate the LOA to SMS/800.
After a successful request, a new tab in the browser appears displaying the newly created LOA document. This file can be downloaded, signed, and saved. Then browse and select the saved document into the LOA File field.