| 8MS User Guide |
Choice Lists |
Main Help Page |
Many 8MS screens provide data in the form of Choice Lists. These lists are used for several different purposes:
Several 8MS Choice Lists are customizable via a set of Company/User Preferences and provide additional features. These lists include:
| Toll-Free Numbers |

|
| SMS Templates |

|
| 8MS Routing Sets |

|
| Number Lists |

|
| Portal Clients |

|
Initially, each list is limited to a small set of recently used items. The number of recently used items is determined by a RecentCount Preference (the actual preference names are shown below) and may be modified by you.
The 8MS user interface remembers your most recently used Toll-Free Numbers, Number Lists, SMS Templates and 8MS Routing Sets. Whenever a Toll-Free Number, Number List, SMS Template or 8MS Routing Set is referenced (i.e., selected or created) on any of the 8MS screens, the item is added to its appropriate most recently used list. The newest most recently used item is at the top of the list while the oldest recently used item is shown at the bottom.
You may add a set of favorite items to this list by setting the MyFavorites preference. The items stored in this preference will appear above the most recently used items, in the order they appear in the preference.
To the right of each drop-down list is a button that allows you to modify what items appear in the drop-down list. Selecting this button will populate the choice list with all possible values for that choice list. Items in the list will then be sorted alpha-numerically. Selecting the button again will return the view back to the most recently used and favorites.
This button may be colored red, green, blue or cyan. Red is associated with Number Lists, green with SMS Templates, blue with 8MS Routing Sets and cyan with Portal Clients. The button's appearance changes based on the current set of items displayed in the list. The possible appearances are:
 favorites are shown first, then most recently used in
order of use
favorites are shown first, then most recently used in
order of use
 sorted alpha-numerically

When an item in a choice list is selected, a count will appear to the right of the choice list. This count indicates the number of Toll-Free numbers associated with this item. If your data contains a large number of Toll-Free numbers (e.g., you have hundreds of thousands of Toll-Free Numbers active in a particular 8MS Routing Set or pointing at a particular SMS Template), calculating this count may be slow. Retrieving the count of numbers may be disabled by setting the ShowNumberCount preference (actual preference names are shown below) to 0. When this preference has been disabled, a link will appear to the right of the Show All button, in place of the count, as shown below for the Search Local Records screen.

Selecting this link will then perform the count calculation. This gives you control over whether or not you see the count for a particular item on a choice list.
The table below shows each data item and the associated Company/User preferences.
| Item | RecentCount | MyFavorites | ShowNumberCount |
|---|---|---|---|
| SMS Template | RecentSmsTemplateCount | MySmsTemplates | ShowSmsTemplateNumberCount |
| 8MS Routing Set | RecentRoutingSetCount | MyRoutingSets | ShowRoutingSetNumberCount |
| Number List | RecentNumberListCount | MyNumberLists | ShowNumberListNumberCount |
| Portal Client | RecentPortalClientCount | MyPortalClients | ShowPortalClientNumberCount |
| Toll-Free Number | RecentNumberCount |
While SMS Templates, 8MS Routing Sets, and Number Lists are normal
drop-down lists,
Toll-Free Numbers are typically typed into a text field rather than
selected from a drop-down list. To select a recently used toll-free
number click the small arrow
![]() that appears between the text field
and its label:
that appears between the text field
and its label:  . Clicking
on this image causes a pop-up to appear.
. Clicking
on this image causes a pop-up to appear.

One of the strengths of 8MS lies in the ability to create a Number List, a set of numbers with an associated name. This is a convenient way to work with a set of numbers without having to constantly copy and paste that set of numbers; instead, the Number List name is selected. However, in order to use a Number List it is necessary to first create that Number List. Since a Number List tends to be used for multiple actions (that is, referenced in multiple screens), this is not a serious problem.
There are times, however, when a list of numbers is needed for a single task and that list will never again be used. Rather than spending time creating a Number List, you just want to specify the set of numbers on the screen you are currently viewing. To allow for this case, it is possible to create a Dynamic List of Numbers, a set of numbers without an associated name. A Dynamic List of Numbers can be created in one of two ways. The first way is by pasting or typing directly onto the Numbers text area, as shown here.
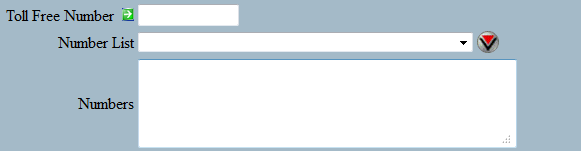
The Numbers text area appears on screens such as Copy Record as well as on the Batch popups, as described in the Batches section.
In some cases a screen has so many search fields that it is difficult
to put a Numbers text area on the screen. The three Search
Local screens
Search Local Numbers,
Search Local Records and
Search Local Carrier Express,
all fit this category.
In those cases, a
 button appears
in place of the Numbers text area.
Selecting this button will cause a popup to appear, as shown below.
button appears
in place of the Numbers text area.
Selecting this button will cause a popup to appear, as shown below.
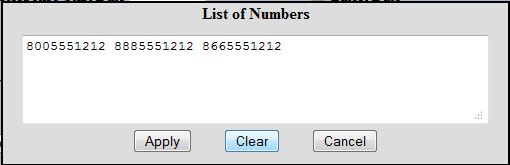
Numbers may be either typed or pasted into this popup. Selecting the
 button will
store the set of numbers as if you had entered them directly on the screen
and the popup will be dismissed.
When an action such as a Retrieve or Retrieve All is
executed, the set of numbers entered in the popup will be applied as
part of the filter.
Selecting the
button will
store the set of numbers as if you had entered them directly on the screen
and the popup will be dismissed.
When an action such as a Retrieve or Retrieve All is
executed, the set of numbers entered in the popup will be applied as
part of the filter.
Selecting the
 button will
dismiss the popup without changing the current set of numbers. Selecting the
button will
dismiss the popup without changing the current set of numbers. Selecting the
![]() button will
clear the text area of any numbers. Note that you must click on the
Apply button to make the clear take effect. Canceling the popup by
clicking on the Cancel button after clearing your list
will cancel your clear action. If you do this,
the previous set of numbers (those shown prior to clicking on Clear)
will then be left as part of your filter.
button will
clear the text area of any numbers. Note that you must click on the
Apply button to make the clear take effect. Canceling the popup by
clicking on the Cancel button after clearing your list
will cancel your clear action. If you do this,
the previous set of numbers (those shown prior to clicking on Clear)
will then be left as part of your filter.
One advantage screens that have the Numbers text area has
is that the set of numbers entered can be seen.
Since screens that have the
button
cannot show the set of numbers specified without bringing up the
popup, to the right of the button there will be a number indicating
how many numbers have been entered into the popup. This is used
to provide some feedback that you have numbers specified as part
of your filter.

Selecting a Number List will clear out the Dynamic List of Numbers; setting numbers in the Dynamic List of Numbers popup will clear out the selected Number List.
If the Dynamic List of Numbers popup has been cleared and applied then no count will be shown to the right of the button. If a Number List has been selected then the Dynamic List of Numbers is also cleared and no count will be shown.