
| 8MS User Guide |
ROC Management |
Main Help Page |
This function allows you to view and manage ROC Authorization Requests.
In the menu frame, select the ROC Mgmt link located in the Number Admin section of the menu. The screen is divided into three main areas. The top area allows you to specify the search criteria. This section appears as follows:
The following is a description of the search criteria:
| Field | Description |
|---|---|
| Entity | search for requests limited to one of your SMS/800 Entities. |
| Toll Free Number | search for requests involving a particular number. |
| Type | search for Incoming or Outgoing requests. |
| Resp Org | search for requests in the specified RespOrg. The Resp Org specified must be in the Entity specified, unless the Entity is All |
| Status | search for numbers whose status matches the selected value. |
| Progress |
search for
Open,
Closed
or All requests.
The Progress field has a default which is controlled by a per User or per Company preference. See Customization, below, for how to modify preferences. |
| Start Date/Time - End Date/Time |
search for requests whose submitted date falls
within the given date range. Either value may
be omitted to select numbers with status dates
after or before a given value.
The Start Date/Time field has a default which is controlled by a per User or per Company preference. See Customization, below, for how to modify preferences. |
| Check Out State | search for Checked Out, Not Checked Out, or Both requests. |
| Checked Out By | the 8MS user id when specifying a Check Out State of Checked Out. |
| Reason | search for numbers whose decline reason code matches the selected value. |
| TxnID | search for the ROC transaction with this TxnId. |
If no start date or end date are provided, all ROC requests will be returned, including old, completed requests. This could result in retrieving thousands of requests.
Once all search criteria have been specified, the search is initiated with one of the following buttons:
 retrieves all numbers matching the search criteria.
The numbers are displayed in groups, one page at a time.
If multiple pages result, hyperlinks are displayed for navigating between pages.
retrieves all numbers matching the search criteria.
The numbers are displayed in groups, one page at a time.
If multiple pages result, hyperlinks are displayed for navigating between pages.
 retrieves and displays all numbers matching the search criteria.
The resulting numbers are not grouped into pages.
retrieves and displays all numbers matching the search criteria.
The resulting numbers are not grouped into pages.
The Retrieve and the Retrieve All results appear in the lower frame as shown in the following:
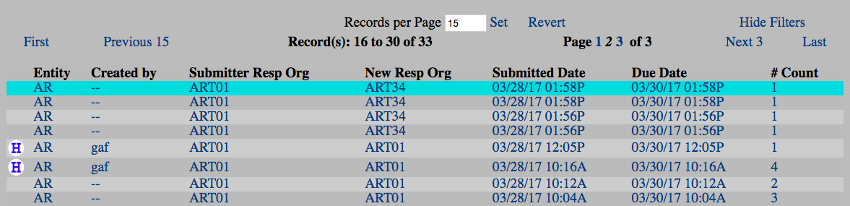
The links and text field shown at the top of this result list are common features of all Search screens. Details on these links is discussed in the Data Lists section of the user guide.
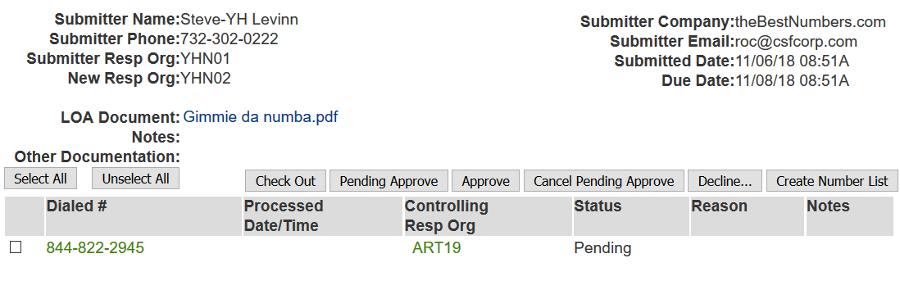
A single request shows the information entered by the requesting Resp Org on the ROC Submit Request screen.
Any documents that were uploaded will appear in the LOA Document and Other Documentation fields. All documents appear as links. Clicking on a document will cause your browser to open the document in your standard way, depending on your operating system and browser settings. Additional documents may be added to this request if necessary; this is discussed below, in the section Managing a Request.
Beneath the request detail is a list of all toll-free numbers that were included in this request. Immediately above the list of numbers are a set of buttons that allow you to modify this request; this is discussed below, in the section Managing a Request.
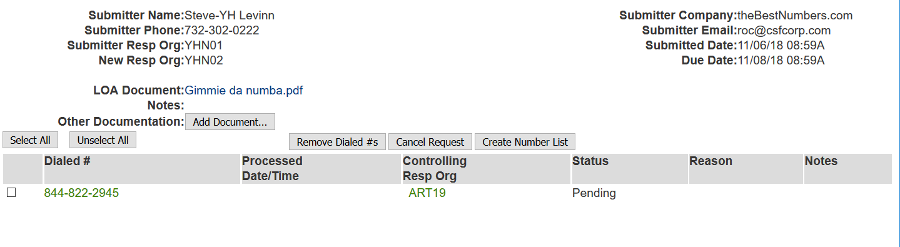
The set of buttons available in the detail changes depending on whether the request is Incoming or Outgoing. The above screenshot shows the detail for an Incoming request. Below is a screenshot of an Outgoing request.
Depending on your user permissions and preferences, you may notice that certain fields are highlighted in various ways. A highlighted field that is a normal hyperlink is a Shortcut to a particular function for this data item. A highlighted field with an unusual appearance is a menu containing a set of Shortcuts related to this data item. See Shortcuts for details.
 retrieves all ROC requests matching the search criteria. Instead of
displaying results in the bottom frame, a popup is produced containing
the retrieved data in a comma-separated format.
The popup is depicted below:
retrieves all ROC requests matching the search criteria. Instead of
displaying results in the bottom frame, a popup is produced containing
the retrieved data in a comma-separated format.
The popup is depicted below:
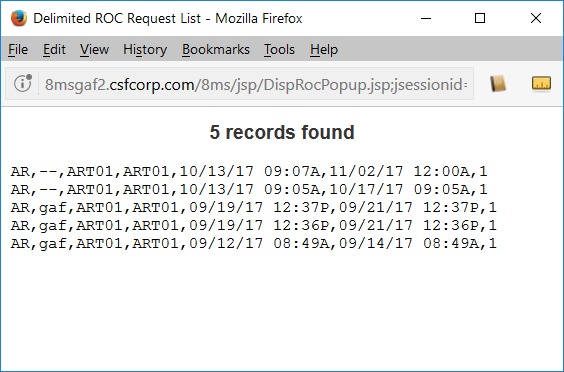
This format, useful for import into a spreadsheet for example, may be saved as a local file or copied and pasted into an application.
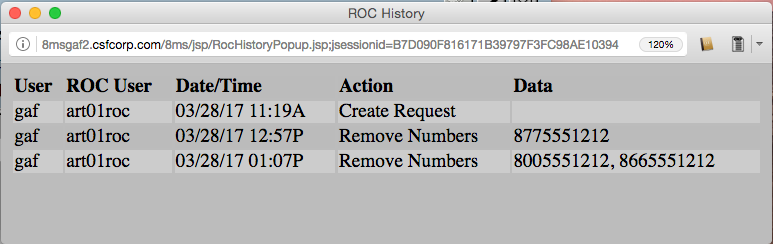
 (ROC History) button on the far left of the list of requests.
When clicking on the ROC History button, a popup will appear with the history of this ROC request, as shown in the example below.
An Incoming request is one that was created by another Resp Org and is directed at your Resp Org. Users in your Resp Org have the ability to approve or decline one or more toll-free numbers in the request. To do this, select the checkbox to the left of a toll-free number and then click the Approve or Decline button. It is not necessary to approve/decline toll-free numbers one at a time; you may select as many numbers as you wish prior to clicking the Approve or Decline button.
In addition to the Approve button there is also a Pending Approve button. Performing a pending approve means that the request should be sent to SMS/800 and stored there until the Due Date of the request has been reached. At that point, the request will automatically be approved. Selecting the Cancel Pending Approve button tells SMS/800 to cancel a pending approve. This may only be done if the due date has not yet been reached.
Additional information is needed when declining numbers. Clicking on the Decline button will display the Decline Toll Free Numbers dialog as shown below.
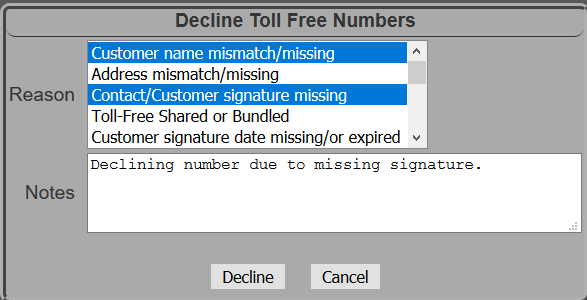
Select one or more Reasons for declining the numbers.
Notes are required to further support the reason.
An Outgoing request is one that was created by your Resp Org, and is directed at another Resp Org. Users in your Resp Org have the ability to add documents or remove numbers from the request.
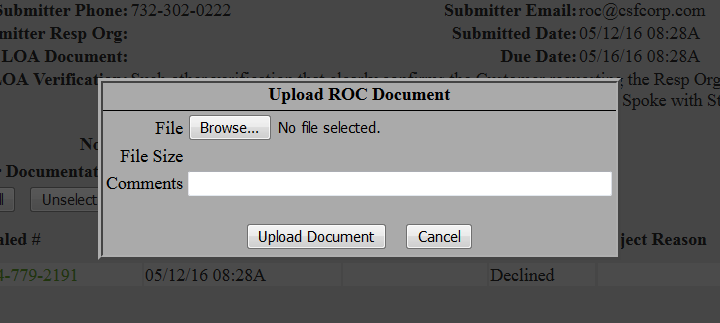
To add a document, select the Add Document button. The Upload ROC Document dialog will appear, as shown below.
To remove numbers from a request, select the checkbox to the left of a toll-free number and then select the Remove button. It is not necessary to remove toll-free numbers one at a time; you may select as many numbers as you wish prior to selecting the Remove button. After selecting the Remove button, the request will be sent to SMS/800.
To completely cancel a request, select the Cancel button. This is equivalent to selecting all the numbers in this request and selecting the Remove button.
The filter section of this screen, shown at the top of this page,
provides a
Check Out State drop-down list and Checked Out By field.
To view only those requests not currently checked out, select the
Not Checked Out value in the Check Out State list and
clear the Checked Out By field. Now specify other filter values
as needed. Only those requests not currently checked out by other users
will be shown. This is indicated in the middle frame by an icon of an
open lock:
![]() .
.
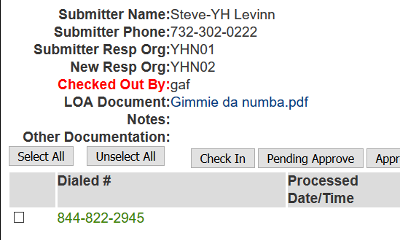
To let other users know that you are currently working on a request,
after filtering and then selecting a single request in the middle frame,
select the Check Out button. The button label will change to
Check In, the middle frame will now show a closed lock:
![]() ,
and the bottom frame the name of the user that has the request checked out.
,
and the bottom frame the name of the user that has the request checked out.
To avoid keeping other users from working with a request, the checked out state does not actually prevent users from viewing or editing a request. Doing so could create potential problems. For example, if a user locked a request and then got side-tracked with other customer support issues, it would be impossible for any other user to finish this request. To avoid this situation, it is possible for one user to check out a request and another user to check it back in, so all users in that company with access to ROC screens have control of all requests.
There are preferences that may be set to change the behavior of this screen. Refer to Customizing 8MS for how to set User and Company Preferences and see ROC Management Preferences for details on customizing this screen.