This document is intended as an aid to managing Resp Org Change
(ROC) Requests.
ROC Definition
Toll-free numbers are reserved and managed by a
Resp Org.
However, the numbers are most often used by a Customer of Record
of that Resp Org rather than the Resp Org itself. When the
Customer of Record wishes to have their toll-free number managed
by another Resp Org, a Resp Org Change is performed,
transferring control from the current
Controlling Resp Org
to the new
Requesting Resp Org.
Prior to 2016, individual Resp Orgs
would contact one another to request that control of a toll-free number
be passed to a new Resp Org. Many Resp Orgs had a specific form that
needed to be filled out by the Requesting Resp Org in order to ask
for control of the number to be transferred. If the Requesting Resp Org
did not submit the proper forms, the Controlling Resp Org would refuse to
perform the Resp Org Change.
In 2016, Somos introduced a centralized Resp Org Change (ROC)
Management System. This system provides all necessary
functionality to manage
ROC Authorization Requests
or more simply, ROC Requests.
Specifically, this system was intended to provide
-
A common, consistent set of data required for
all Resp Orgs to ask for toll-free numbers
-
A long-term history of all ROC requests
-
A programmer Application Programmer Interface (API) to
allow Resp Orgs to submit and manage ROC requests
from their own systems
-
A web-based user interface to allow Resp Orgs to
submit and manage ROC requests
To aid in understanding this tutorial, below are some
common terms related to ROC. These terms and definitions are
copied directly from the
Terminology
section of the User Guide.
-
Resp Org
-
A Resp Org (Responsible Organization) is an entity responsible
for managing Toll-Free Numbers within a company.
Each Resp Org is allowed to reserve, spare, give away or route
Toll-Free Numbers.
-
Controlling Resp Org
-
In a
ROC request, the Controlling
Resp Org
is the Resp Org that currently controls a toll-free number.
A
Requesting Resp Org
asks the Controlling Resp Org to perform a Change Resp Org,
granting the Requesting Resp Org control of the number.
-
Requesting Resp Org
-
In a
ROC request, the Requesting
Resp Org
is seeking to gain control of a toll-free number.
The Requesting Resp Org
asks the
Controlling Resp Org
to perform a Change Resp Org,
granting the Requesting Resp Org control of the number.
-
ROC Authorization Request
-
A ROC (Resp Org Change) authorization request
asks the
Controlling Resp Org
of a toll-free number to port that number to a
Requesting Resp Org, giving that
Requesting Resp Org control of that number. A single request
may contain one or more toll-free numbers.
Numbers do not need to be under the same Controlling Resp Org.
In the event that a ROC authorization request is sent to
multiple Controlling Resp Orgs, when a Controlling Resp Org
views the request, it may only see the numbers that are
controlled by it.
-
A ROC Authorization Request is also known as a ROC Request.
For ease of reading, in the remainder of this document, the
term ROC Request will be used.
-
Customer of Record
-
A Customer of Record is the end user of a toll-free number.
It is the company or person that actually receives calls
on that toll-free number. The Customer of Record is the
only entity that has the right to request that a number
be ported from one Resp Org to another.
-
LOA
-
LOA is an acronym for Letter of Authorization. An LOA is
a document that shows you have the right to ask a
toll-free number Controlling Resp Org to port that number
to your Resp Org. An LOA is meant as proof that the
Customer of Record has requested this port.
-
LOA is also interpreted to mean Letter of Agency.
A ROC request contains proof that this is a valid request being
performed on behalf of the toll-free
Customer of Record.
It also contains
one or more toll-free numbers used by that Customer of Record.
While a ROC request is treated as a single item, the numbers within
that request may be treated in different ways. It is possible
for a Controlling Resp Org to approve some numbers in a request while
declining other numbers. It is possible to decline some numbers in a
single request for one reason and other numbers for another reason.
When declining a request, a reason for the decline
is required to ensure that the toll-free Customer of Record has actually
asked for this Resp Org change. If the Requesting Resp Org has not
offered reasonable proof, the Controlling Resp Org has the right
to refuse the request. The reason tells the Requesting Resp Org
what specific data is needed for this request to be processed.
The numbers within a single request do not have to be controlled by
a single Resp Org, nor do the Controlling Resp Orgs need to be within
a single Entity. A Controlling Resp Org receiving a ROC request is only
able to view those numbers controlled by itself; it may not see numbers
controlled by other Resp Orgs. Thus, a Controlling Resp Org may not
see all numbers within a request. Only the Requesting Resp Org sees
all numbers within a single request.
There are two types of ROC requests:
-
Incoming ROC Requests are requests created by another Resp Org
and directed at your Resp Org. These requests ask you
to release toll-free numbers to the Requesting
Resp Org.
-
Outgoing ROC Requests are requests created by your Resp Org
and directed at other Resp Orgs. These requests ask
other Resp Orgs to release toll-free numbers to your Resp Org.
ROC requests may also be split by their processing status:
-
Open ROC Requests are requests that have at least
one number which has not been either approved or declined.
-
Closed ROC Requests are requests for which all
numbers have been either approved or declined.
While users could choose to use the Somos ROC user interface, using the
8MS user interface provides multiple advantages:
-
Once logged in to 8MS, there is no need to jump to a separate system;
all ROC features are fully integrated in 8MS.
-
8MS provides multiple Entity support, allowing you to view all
ROC port out/port in requests across your many Entities without
having to log out and log back in with a different login.
-
8MS provides a single screen to view all details of ROC requests.
For a quick turn-around, this screen allows you to:
-
review all requests
-
approve or deny incoming requests
-
modify or cancel outgoing requests
-
8MS provides a single screen to create ROC requests, making
it faster and easier to do so. Simply enter your number(s),
Resp Org, and LOA and then send the request.
-
The work-horse of 8MS, the Number List, makes for seamless
port-ins, routing changes, carrier activations,
and other batch functions.
-
8MS provides a user-specific history of all ROC request changes,
making audit and accountability easy and more comprehensive.
-
8MS provides a comprehensive REST-based API to
make ROC process integration faster and easier.
-
8MS ROC Ports are free! 8MS users do not get
charged for ROC transactions.
8MS uses the ROC API to provide a comprehensive set of screens
and 8MS APIs to create, view, and manage ROC requests. Both
the 8MS screens and the 8MS APIs leverage existing 8MS features,
especially number lists, to make creation and management of
ROC requests more powerful and easier to use.
The new 8MS ROC screens and APIs provide the following capabilities:
-
The ability to submit a new ROC request using the
Submit ROC Request
screen and the
ROCNumberRequest
API call
-
The ability to retrieve and view pending and old (closed)
ROC requests using the
ROC Management
screen and the
ROCRetrieveRequests,
ROCRetrieveRequestDetail
and
ROCDownloadDocument
API calls
-
The ability to approve or decline pending incoming ROC requests
using the
ROC Management
screen and the
ROCManageRequest
API call
-
The ability to remove numbers from pending outgoing ROC requests
using the
ROC Management
screen and the
ROCManageRequest
API call
-
The ability to cancel pending outgoing ROC requests
using the
ROC Management
screen and the
ROCManageRequest
API call
-
The ability to add additional documentation to pending
outgoing ROC requests using the
ROC Management
screen and the
ROCUploadDocument
API call
Before using the 8MS ROC screens, it is necessary to configure your
8MS account with a Somos login with ROC permissions. This is briefly
described below. For specific details, refer to the
Configuring ROC Access
page of the User Guide. Below is a high-level description of
the configuration process.
-
To begin, you must have a valid Somos login with ROC permissions.
If you already have a login on Somos, you may use that one.
We strongly recommend that you create a new login that is
dedicated to use within 8MS.
Somos uses password aging when you log onto their system.
Should you choose to use the same Somos login for both
8MS ROC transactions and for logging onto Somos, at some
point, you will log onto the Somos web site and be forced
to change your password. When this happens, you will also
need to update that password on 8MS or ROC requests from
8MS will fail. If you have separate logins for your Somos work
and for ROC, you will never have to deal with password
aging, since Somos does not enforce password aging from
API users.
-
Once you have confirmed that you have a valid Somos login with ROC
permissions, you will need to fill in a form that gives your 8MS
system permission to send ROC requests on you behalf, using your
Somos login. This form is available from the 8MS system; select
Documentation from the menu then and select the
ROC Access link.
After filling in the form, email it to 8MS Customer Support at
8mscust@iconectiv.com.
The 8MS support team will send your form to Somos to process,
activating your login for 8MS ROC.
Somos ROC permission is managed by Entity. For that reason,
on the Somos form, you must provide one login for each Entity
within your 8MS Company.
-
Once the Somos ROC access form has been processed, you will need
to add your login and password to the
ROC Administration
screen. Saving this login and password enables 8MS to send ROC
requests on your behalf.
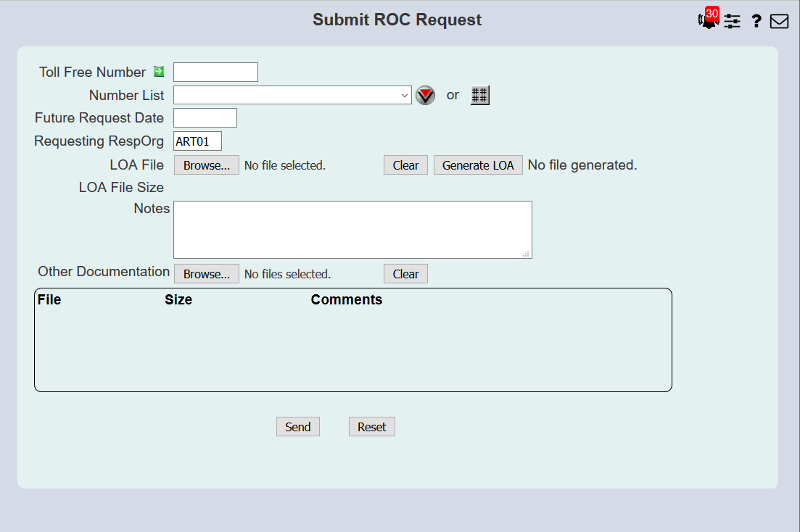
A new ROC request is generated using the
Submit ROC Request
screen, as shown below.
Submitting a new request is very straight-forward.
At a minimum, you need to fill in the Requesting RespOrg
field, select an
LOA
File and provide one or more toll-free numbers using the
Toll Free Number field, Number List drop-down or the
 (Dynamic List of Numbers)
button.
(Dynamic List of Numbers)
button.
Optionally, you may provide notes in the Notes field
and additional documentation using the Other Documentation
button if you believe it necessary to aid in approval of this request.
Additionally, you may schedule this request for a future date using
the Future Request Date field.
The request will reside on the Somos ROC system but will not be
processed until the date is reached.
Once all fields have been filled in, select the
 button to send the request to Somos where it will be queued
up for processing.
button to send the request to Somos where it will be queued
up for processing.
ROC requests are viewed and managed on the
ROC Management
screen.
Requests may be filtered based on various attributes of a request, as
shown in the screen shot below. See the
ROC Management
User Guide page for a detailed explanation of these fields and
more information on this screen.
When filtering, only Incoming or Outgoing requests may be viewed; it
is not possible to view both at the same time.
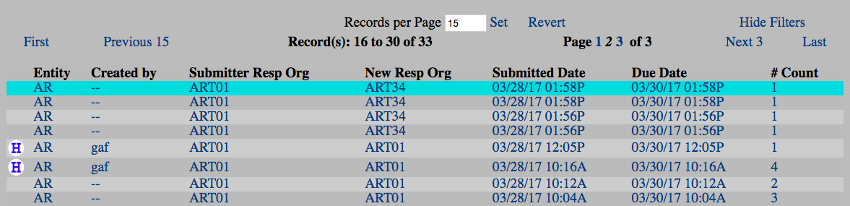
After specifying your filter criteria, select the
 or
or
 button to view your requests. An example list is shown below.
This list shows a few attributes of the request itself, plus a count of the
toll-free numbers in this request.
Selecting one of the rows in this list will populate the detail portion of
this screen, as shown below:
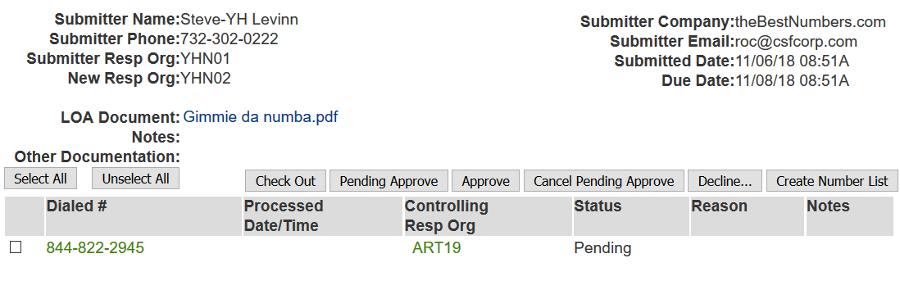
As noted above, you may only view one type of request at a time, so
the set of buttons available in the detail of a request will change
depending on whether you're viewing an incoming request or an outgoing one.
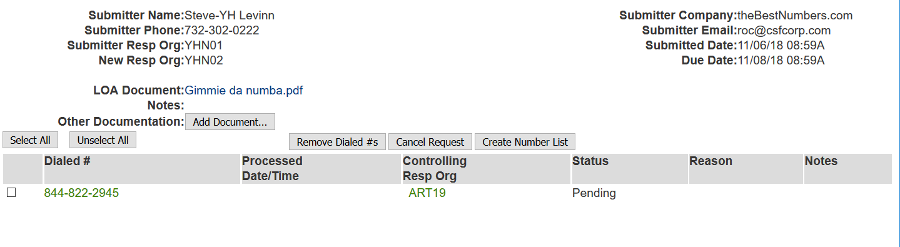
The screen shown above is the detail for an Incoming request. Below
is the detail for an Outgoing request. Note the difference in what
buttons are available.
To view changes made to a ROC request made by 8MS users, you may use
the standard way of viewing 8MS activity, via the
Activity Log. In addition
to this, each item shown in the list above may have additional activity logging.
If there is additional logging, a
 (ROC History) button will appear on the far left of the list of requests.
ROC History will only be available if an 8MS user made the request
on this platform. It will not show activity by users on the
Somos ROC platform, nor will it show activity by the other
Resp Org company.
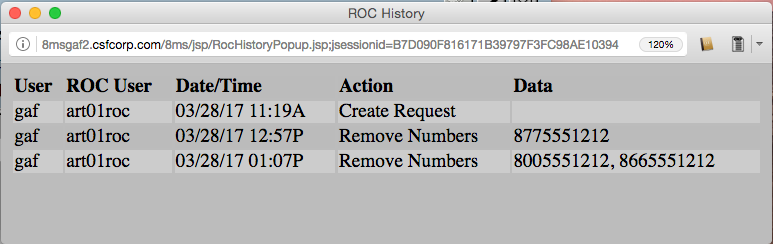
To view this additional history, click on the ROC History button and
a popup will appear with the history of this ROC request, as shown
in the example below.
Operations on incoming ROC requests include:
To approve or decline numbers, identify the numbers by selecting the
checkboxes to the left of each number, then select one of the action
buttons on the right side of the detail screen.
Operations on outgoing ROC requests include
-
Removing toll-free numbers from a ROC request.
-
Canceling a request.
-
Adding additional documentation to a request, probably because
the Controlling Resp Org wanted additional proof that this
was a valid request.
To remove numbers from a request, identify the numbers by selecting the
checkboxes to the left of each number, then select the Remove
button on the right side of the detail portion of the screen.
The Somos ROC System does not actually remove numbers
from a request. Instead, it marks those numbers as
Declined, with a Reason of Auto-rejected by Submitter.
To completely cancel a request, select the Cancel button
on the right side of the detail portion of the screen.
This is equivalent to selecting all the numbers in this request
and selecting the Remove button.
To add one or more documents to a request, select the Add Document...
button to the right of the Other Documentation label.